The Ultimate Musician's Curriculum for Middle School
The "Ultimate Musician" Project Overview
Breath Support Enhancers:
1.) "Gut Busters"
2.) "Stagger Beathing Simulations" and Warm Up:
"Rhythm Motions:
This one might be “really out there” for most, but trust me, it works. Starting day one, in sixth grade beginning band I began teaching “Rhythm Motions” (sometimes called “signing rhythms”). Not all at once, but quarters and their rests, and then the half, dotted half, and whole notes/rests. Their counting is actually the “drawing” of many of the notes and rests, so I did not have to teach how to identify and how to count them in two separate phases. The application of “Rhythm Motions” should also always be done with a metronome. Their “gross motor motion” coincides with the physical timing of each note or rest, making rushing a bit difficult. You also have the added benefit of (what I call) a “filling in the gap(s)” strategy for teaching the counting of rests. The rest motions also coincide with the exact amount of time that silence should exist in the music being played. Initially (as they did the motions) I would have the students say both the note names and rests out loud as they performed them. Later on, I just had them say only the notes and perform the rests in silence.
After about the first nine weeks, I would begin the transition to a regular, “less active” approach to counting. However, if students began messing up counting notes (or cheating on rests) we would go right back to our “motions” and then re-apply whatever our standard counting method was. It gives you a “back up” system AND a way to confirm the accuracy of your normal counting system as you write it or perform it. It is kind of like “checking your school math problems” which (in fact) is exactly what it really is. It obviously will be sometime before your beginning class arrives at 8th rests (if they arrive at all during their first year). Initially, these rests can easily just be ignored. However, when they would get there in 7th grade I would revisit “Rhythm Motions” (they never forget them) and then had a certain way to drill mixing up 8th rests on the down and up beats, which I can discuss with you later if interested.
Another thing I like about “Rhythm Motions” are; it creates a kind of “game like” atmosphere, and you can create a variety of fun challenges around them. For example; a student volunteer can perform a 4 count rhythm motion, (with a metronome), and then the class tries to identify what he or she just performed. Students can also be asked to write the notes and rest (music notation) down on a piece of paper as a student generated “quiz” or “challenge”. I normally do 8 counts of motions for written activities, and ask the student performing the quiz, to write down what he or she is going to perform. In this way, I can check and see if what they are performing is correct and base his or her grade on their writing accuracy. Another thing I liked to do (to “cross-reference” comprehension) is to take about a minute or two daily to “motion” a few rhythms and then have the class “clap” them back to me. I would gradually extend the length of my motions as their skill levels would increase. Finally, in the 7th & 8th grades, if a section or the full band was having difficulty with counting a section of music, I would first try using “Rhythm Motions”, or a “non-metered verbal analysis” (which is a “Rhythm Masters” technique). In this way I could avoid singing or saying the counting to them, knowing that they are analyzing or figuring the rhythm(s) out on their own, and not just memorize the sound(s) they hear me singing or counting out loud.
I had a lot of fun using “Rhythm Motions” with my students and I think you might, as well. From a teaching standpoint, the potential teaching options and variations you can come up on your own is limitless. If you have any questions, or am not sure of ways to use “Rhythm Motions” with your instrument classes and ensembles, please feel free to contact me. My contact information is listed below.
Sincerely,
Rich Moon
843-875-5594
moonerk@bellsouth.net
Note: Move “slider” down for additional pages (if there are any), or click on the exercise to access another tab with all of the instrument transpositions.
3.) "Rhythm Motions" / Sound
4.) "Rhythm Motions" / Silence
5.) Beginning Band Rhythm Motions Warm Up" #1 & #2
6.) Rhythm Motion's Curriculum:
7.) Additional Rhythm Motion Exercises:
8.) "Down to Up Beat Arrow Flash Cards" Version "A":
9.) "Follow the Arrows" Introduction to "slash" Notation:
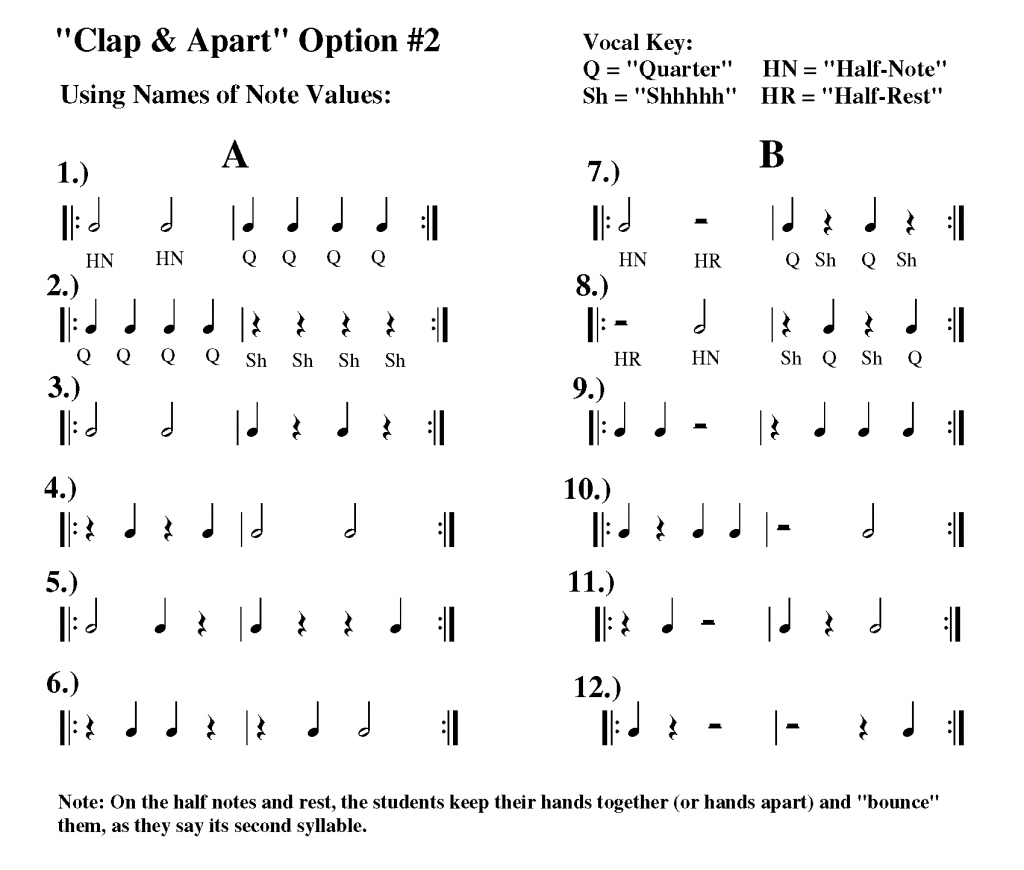
10.) Clap and Apart using "Rhythm" Names of Notes:
In the “Ultimate Musician’s” program, I take most of the student participants to the “rhythm mall”. I run through the “R.M.” rhythm vocabulary lists (S.A.S. sheets) in sequence to see if each student has any particular weaknesses anywhere. If I do, we then experiment (we “go shopping”) with several different systems or approaches to see what works best for each particular student. Two students, from two different schools (for a variety of reasons) were struggling with all of them. I kind of “winged” a few ideas and one of them was clapping, while saying the name of each particular note or rest. It is kind of a “spin-off” of “Rhythm Motions”, using the number of syllables in each name to define its duration of “sound” or “silence”. My concern was though, they would have trouble (when performing) to differentiate between notes and rests, but it did not throw them at all. On the half notes and rest, the students keep their hands together (or hands apart) and “bounce” them, as they say its second syllable. I will continue evolving this concept as far as it will go, and at some point (when the skills needed are mastered) I will transfer these two students back to a more “traditional” system, allowing their counting skills to continue to grow. At any rate, that is what the “Clap and Apart Note Names” sheet is all about.
11.) Beginning and Early Band Miscellaneous:
12.) Identifying Note Names on the Staff for Elementary and Middle Schools:
13.) The "Clarinet Break" Made Easy:
Tuning Sequences for the Ultimate Trombone Musician:
The Trombone “Slide Positions” Flash Card Game:
Even trained as a “trombone player”, over the years I have adopted a different approach for teaching beginners and middle school trombonists. It will seem kind of “strange” to most, but I find the results (especially with the younger students ability to hear and “play in-tune”), superior to traditional methods of trombone instruction. First, I do not even mess with 7th position. Over 50% of the 6th graders can’t reach anyway, it just gives them a reason early on to “hate” playing trombone, and you won’t see the d_ _ _ thing applied in their music for a year or two, if that. Let them grow a few more inches and then when it does show up in their music, give them the good old “Oh, by the way, go to 6th position and just ‘shove’ your shoulder forward”. By then, it will be too late for them to switch to another instrument.
Seventh position however is not the “radical philosophical change” I am talking about. I believe in only teaching three slide positions along with two additional “consistent” or “changing” variables. These “variables” are first introduced separately, and then added together, which is the purpose of the “Slide Position Flash Card Game”. Besides, it puts a little fun into students learning their trombone slide positions (all six, as they are compared to each other tonally). It also allows two or more trombone “friends” to get together and practice playing and identifying slide positions as a team. A student’s learning time and comprehension is almost always improved when he or she is put into a position of helping and correcting their peers.
The three positions which I like to teach are; 1.) “arm in”, 2.) (knuckles) “to the bell”, and 3.) “arm out”. The two variables by the way are “wrist in” and “wrist out”. Note: See the attached diagram, which I use to pass out to my beginning trombonists in band class. Start with the odd or “wrist in” slide positions, and work on the slide position’s pattern of “1, 3, 5, 3, and 1”. “Wrist in” is easy, it is just normal 1st position. Now, taking your “knuckles” to the bell (WITHOUT STICKING YOUR FINGERS UP TO TOUCH THE BELL), you will find that “wrist in” puts the slide just in front of (3rd position), and “wrist out” just behind (4th position) the trombone bell. For a 6th grader’s average size, the “arm straight out” (with “wrist out”) is a fairly accurate place for 6th position. If you put the arm straight out, with the wrist in, you will also get pretty close to the correct 5th position. BUT, how can you really tell if these normally awkward slide positions are accurate and “in tune”?
This is where “alternate” slide positions can REALLY come in handy. Once a student is in (what they think is) 5th position, have the student return to their first position and play their high Bb. Be sure they are listening carefully to that pitch, and then have them return their slide to what they “think” is 5th position, matching that same high 1st position Bb pitch. Go back and forth between 1st and 5th position (both arm out with wrist in) until the child consistently plays the same pitch (I like three times in a row). After the student “hits the jackpot”, simply change the 5th position Bb’s pitch down to the Gb just below it. Return to your previously started “odd” slide positions drill of 1, 3, 5, 3, and 1, but now playing the notes low Bb, Eb, and Gb as you go up. If the 5th position “Gb” starts “not tasting right”, go back to your Bb in 1st then 5th position comparison drill and tune it back up again.
Next we can work on the “wrist out” (or “even” slide position) variables, using the pattern “2, 4, 6, 4, and 2”, in the same fashion as before. With this pattern, we will play the notes low A, D, and F. This time, we will use the alternate slide position for “F”, playing that note in 6th position instead of first. We will tune the alternate 6th position “F” with its regular first position note on the slide in the same manner we used Bb to tune our 5th position notes. Once both of these slide position sequences (the odd and the even) have been explained and explored, the “’Play Any Pitch’ flash card game for trombone slide positions” can be introduced. Another Note: In this game, the “pitch” they play is irrelevant because I want the students to strictly focus on tuning each of the cards slide position combinations. Cut the cards out of the two attached papers, the 6th and 7th position cards are optional (I personally do not use them). Practice the slide position cards going down first, and then the slide position cards going up. Help your students out by observing any “tendencies” they may demonstrate, like, when going down they might over shoot certain slide positions. For the most part, the idea is to keep most of the half steps fairly tight to each other, in a similar way that J.S. Bach adjusted pitch in keys with excessive accidentals in his “Well-Tempered Clavier” (1722 & 1742). The final step is to put all of the cards together and shuffle the deck before playing the game with a parent, sibling, or other trombone player(s). An additional minor benefit of working odd and even slide position’s, is to get your young trombones playing, listening, and tuning to intervals other than the step wise motion in their most
14.) Trombone Wrist Chart #1:
Trombone Wrist Chart #2:
15.) Trombone Slide Position "Flash Cards" Intonation Drills:
16.) A Trombone Pitch to Piano Note Equivalency Keyboard Map:
17.) A French Horn Pitch to Piano Note Equivalency Keyboard Map:
A French Horn to Piano Note Equivalency Keyboard Map
Dear Amplify,
I was working with two 7th grade French horn players, helping them get ready for South Carolinas “Contest Performance Assessment” performance the other day. Two very young and talented horn players, one of which was a beginner. Their biggest “issue” was finding the correct pitch (surprise, surprise!!), especially for particular interval combinations. I asked them if either one plays piano, and to my surprise, both said yes. “Great,” I said and explained that I had jotted down a “piano to french horn” chart for students earlier and that I would e-mail it out to them. I then thought to myself, “wouldn’t it be great if there was something that could help young french horn players find pitch, that DID NOT already play the piano.
Well, Why Not? Most anyone can tell the difference between black and white keys on a piano, and if these students could read a simple map, problem solved! Even if they do not have a piano at home or one in a practice room at their school, anyone can download “Garage Band” on their cell phone, FOR FREE! Someone out there has probably figured this out already, but you will have to forgive me if so. I retired a few years ago and am not that current with new materials and method books that have come out recently. I am attaching the first and my latest versions of the note “equivalency” chart. Hey, if either one helps out, use them. Starting french horn players (outside of “double reeds”) might be the biggest challenge that beginning band directors face. So anything that might help is worth a try.
That’s all for now.
Sincerely,
Rich Moon
19.) Down to Up Beat Transitional Flash Cards:
19.) Beginning Band Warm Ups #'s1 - 3
Band Warm Up #2
Band Warm Up #3
"Tetra-Chord" in Five Keys:
20.) "Tetra-Chord" in Seven Keys:
21.) Band Warm Up #4
22.) Band Warm Up #5
23.) "Scale Torture" Seven Major Scale Supplement for Concert Band:
“Scale Torture” – The emphasis here is on reading keys, but it is also excellent for teaching scales. It helps a director focus directly on the particular step(s) of any given scale or key giving his or her students trouble. It is designed for the middle school musician, concentrating on the first seven scales, and only using one octave per key. However, its teaching effectiveness is the best out there, at least until your students learn to lock in on those “funky little symbols” to the right of the clef sign. Many directors already use this material in some form or fashion, I just wrote it down and added a few other little “tidbits.”
24.) Time Line Warm Ups
24.) "First Three Basic Articulations"
25.) “Articulation and Arpeggio Scale Studies”
“Articulation and Arpeggio Scale Studies”
As the title indicates this covers three performance areas for mid-to-advanced middle school musicians. Starting as a review for the first 7 scales we add 5 of the most basic articulations as you review each scale. The “slur” and “staccato” articulations are reviewed using four different combinations with an arpeggio (in each key) tagged on in the last two bars. During that time “dynamic” contrasts can be observed incorporating an additional process level as an option. In the bottom section, you can continue to work on arpeggios using a two-octave format for scales and instruments where the second octave would be within your student’s range. It is suggested that you use the last two bars, of whatever key you are working on, as a reference for the notes to play for each instrument’s root, 3rd, 5th, and octave. In the final bar, the ensemble plays a unison half note on the root, dividing your ensemble to cover the full chord on the last half note.
Rich Moon
26.) "Think Fast" Scale and Key Signarure Drills:
“Think Fast” Scale and Key Signature Drills:
This exercise sheet is designed for both high school and middle school and focuses on quickly changing key signatures from one to another. “Think Fast” is another sheet my students hated to play, but when it comes to changing key signatures, you get a lot of BANG! for your buck. Four audio “playback” files accompany this sheet. First is the full-length MP3, running from beginning to end. There will be an 8 Count “count-off” before each of the sections “A,” “B,” and “C.” You will play each set of scale exercises to the end of that section before stopping. The other three MP3s are options that allow you to focus on one section at a time. If your students have difficulty with accurately changing keys when they sight read, these exercises are excellent ones to work on. This could be especially helpful if your students are looking for materials to help them prepare for the “sight reading” portion of any upcoming honor band auditions which they might be scheduled to participate in. The “Think Fast” series was designed in conjunction with the “Six Rhythm Categories in Six Different Keys” as a way to “hyper-focus” on reading keys if reading or changing key signatures are an issue students might be concerned about when sight reading.
Note: All MP3”playback” recordings were made at one tempo, 60 “bpm.”
Sincerely,
Rich Moon
"Think Fast" Scale and Key Signature Drills MP3 Audio File:
Middle School A
Middle School B
High School
27.) Fun with "minor" Scales:
"Fun with minor Scales" MP3 Audio File:
28.) "Half, Whole, & Quarter Practice"
29.) "Down to the River" Four Part Chorale for Band:
“Down to the River” By: Alison Krauss
I heard an acapella choir sing a beautiful arrangement of “Down to the River” and decided to sketch it out just for some of my friends. I arranged it from what I remembered, hence the “liberties” that were taken. What I thought was cool, is it gives a band director the ability to review various 16th note rhythms, at a very slow tempo. There are not too many chorales written where you can reinforce 16th note counting. I decided to write out all four parts, for each instrument. If you want to keep everything on one page, play the first half only, stopping at the fermata at bar #9. I suggest you have your full band all play part one first, to benefit from the 16th note counting review. After that, assign the four chorale parts however you wish, for balance. I did the arrangement for about a “end of the year” middle school level. Where there are “split” octaves, the students can choose which ever note range they feel more comfortable with.
The second half offers some additional challenges. Such as a slower tempo, making the phrasing more difficult. Then a big piano to forte crescendo, followed by a “subito-piano” immediately after a unison ensemble breath. This gives your ensemble the opportunity to work on unison breathing, as well as, push their dynamic “extremes” to the max. Directors can also ask their students to ignore all dynamic markings and cue all tempos and volume changes themselves. This gives your band members a chance to get more used to following their director.
Below is a URL link to a “you-tube” video performed by Alison Krause and “Union Station” if you not heard it yet. ENJOY!!!
https://www.youtube.com/watch?v=swOLCLrqBn8
Sincerely
Rich Moon
"Down to the River" Chorale MP3
30.) Interval Studies
31.) "The Expanding 'Tour' of Intervals"
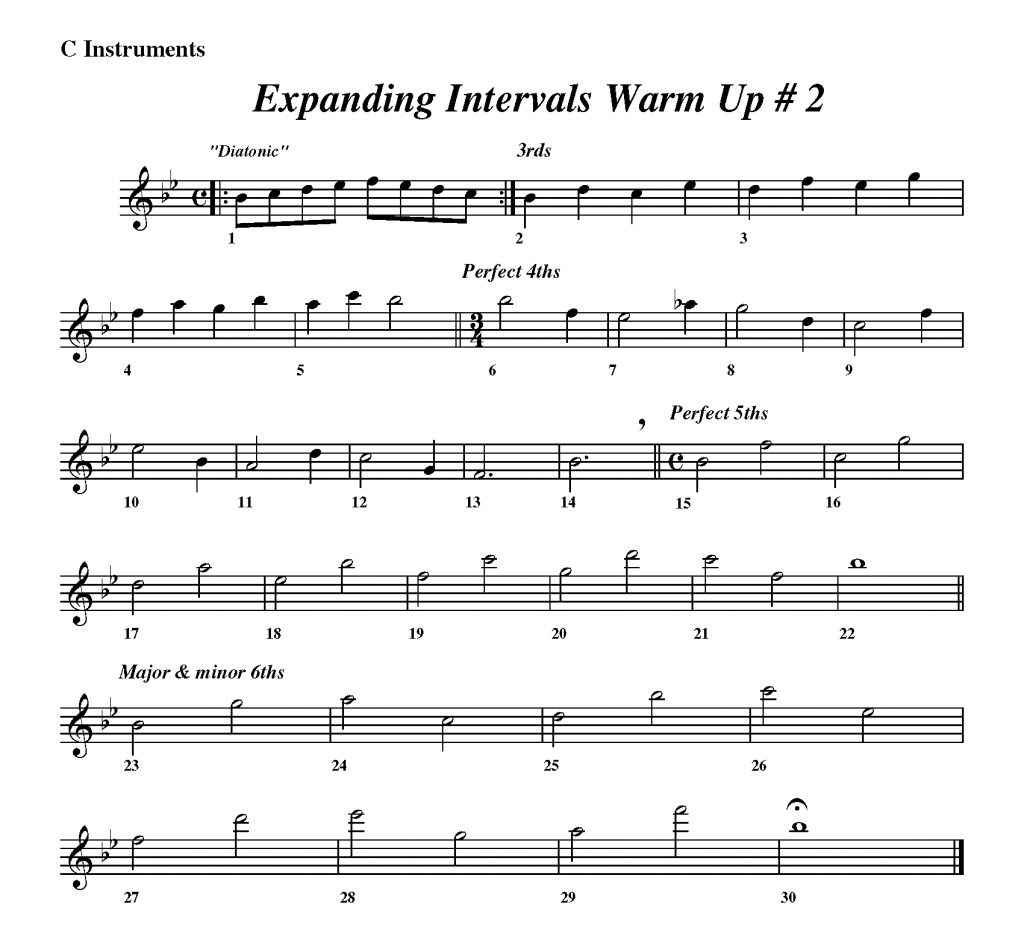
32.) Expanding Intervals #2 - Warm Up:
E.I. Playback = 60
E.I. Playback = 84
E.I. Playback = 120
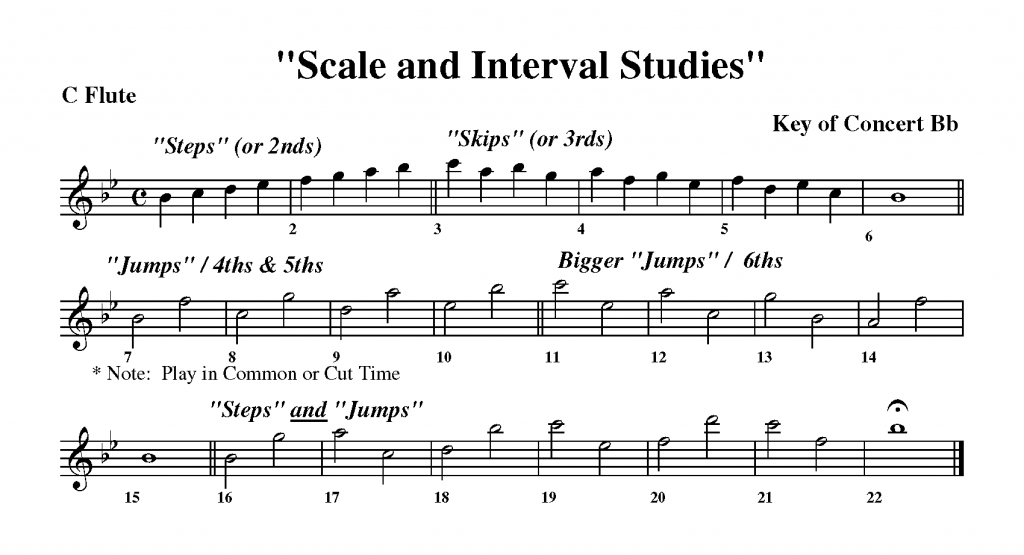
33.) Scale and Interval Study in Concert Bb:
34.) "Interval / Scale Exercises for Mallet Players"
35.) "Fun with Thirds"
“Fun with Thirds” started out as a warm up exercise I wrote for mallets, for my grandson, who is a 7th grade percussionist. The MP3 audio file included is a “rapid fire” version of the exercises. Rather than “Continuing the Series” as written you play the page exactly as written. This gives the student something to play along with, as it tends to focus more on transitioning through seven different key signatures.
36.) "More Fun with Intervals"
37.) “Extending Intervals Using the Whole Tone Scale”
With middle school brass players, I have recently focused on accurately finding the correct pitch on their instruments. I have noticed several brass players struggling with this, and when moving a slide or changing valves, most tend to only go up to the next closest partial, no matter what is written on the staff. One reason might be that the materials they play in middle school rarely require brass students to “skip partials.” Even the strongest of 7th and 8th-grade brass are relatively behind in this particular skill compared to others.
I have presented several previous exercise sheets to give your middle school students more exposure to this issue, and one of those has been “extending interval” exercises. Using a series of major and chromatic scales, I have done so and applied several basic interval skips through performance. With this latest challenge, I wanted to work on extending intervals using a completely unfamiliar “sound” and format from what most middle school students are used to hearing, the “whole-tone” scale. My thought is that students cannot rely on their familiarity with scales they have already mastered. Instead, they must rely on their knowledge of embouchure, air velocity, jaw settings, and tongue placement to accurately perform these unconventional interval skips.
To be honest (as a band director), I never used the “whole-tone” scale in the first half of my teaching career. I was first exposed to the scale in my collaboration with Scott Rush on the “Habits of a Successful Musician” series. As we were writing the book, I initially thought that this section in his series of warm-ups was “kind of weird.” As I continued working with Scott, it gradually made more and more sense to me. In the “Habits” series, we used the “whole-tone” scale to extend the beginning student’s range, with one note higher and lower in each sequential unit. I liked that it took band students out of their “comfort zone” and gave them a chance to use and perform unique modalities. Consequently, I have used the “whole-tone” scales in several exercises I have written for the “Ultimate Musicians” project that I am presently working on. I thought I would share this one with you.
Sincerely,
Rich Moon
Finding the Pitch "Boot Camp"
One of the areas targeted in the “Ultimate Musician’s” program, which I am field testing is the skill of “finding the correct pitch.” The level I am mainly targeting is middle school, and when woodwinds, put down the right combination of fingers, and you almost always get the right pitch. It is not that easy with the “brass” half of the equation. We will do our ensemble lip slurs, which is probably the best warm-up for brass players. The younger level brass student “slurs” from one partial to another, but (trust me on this) in many cases, they do not connect the adjustment of the jaw position and airspeed skills acquired in these warm-ups with the application of playing correct pitches. They put the slide in the 4th position with a trombone, use the 1st & 2nd valve combination on the trumpet, and assume the correct sound will come out of the bell. Many are clueless about having to “skip” a partial (or two) to get to the correct pitch as written in their music. With most middle school repertoire and method books, the majority of the students do not get a sufficient number of “reps.” to be able to play beyond the next “partial accurately.”
I found this to be the case working with 40 to 50 musicians at four different middle schools while helping them prepare for the sight-reading portion of their honor band auditions for this year. Writing sight-reading etudes is one of my “specialties,” Most of the ones found in the “Habits” book series were my contributions. The “Finding Pitches” sheets attached are one way I am trying to address and correct the problem, using the fact that your woodwinds are intrinsically much more reliable than your brass at performing correct pitches. “Finding the Pitch” is a “first-generation” attempt to address the issue, but I am still experimenting with more efficient and “instructional time-saving” ways of accomplishing the same goal. I am posting this on “Amplify” to share it with you and am very interested in any opinions or suggestions that you may have. You will also notice that while I am targeting “random pitch changes,” I am also taking the opportunity to reinforce band students’ ability to read notes in six different key signatures. One aspect of the “Ultimate Musician” field testing I am doing (which the band directors I work with seem to appreciate) is, while targeting one very specific of skills, I look for opportunities to reinforce additional targeted areas within the “U.M.” curriculum. I am trying to combine the “multi-tasking” aspect of being a musician with the chance to “spiral” in other areas that seem to be giving young musicians some trouble.
Sincerely,
Rich Moon
843-875-5594
38.) Finding the Pitch "Boot Camp"
39.) Combining Warm-Ups and Creativity with "Pachabel Canon"
"Pachabel Canon" MP3 with Count Off's & CT
"Pachabel Canon" MP3 with Count Off's Only
"Pachabel Canon" Chorales in 10 Different Keys, by Instrument:
"Mix'em Up" Alternate Uses:
Although this exercise was written as a part of the “Pachabel Canon” creativity project, we found several other ways to use them that might benefit your band class. Note that the two pages of “rhythmic options” are set up in three difficulty levels; the first six lines are basic, the following six lines add 8th notes and quarter rests, the last six lines focus on the three main “syncopation ratios”.
Reading Key Signatures & Sight Reading Applications:
* After playing your 7 scales (optional) select 2 or 3 different scales and full ensemble play 1 scale degree per measure.
* Select one scale for “key” review and play one line up and the next line down that same scale. The first line starts on the tonic, the second (coming down) on the octave.
* “Noodling” – Two difficulty levels; change scale pitch per measure, or change the pitch each note.
* Play or clap (counting out loud) lines individually or combined.
* Play line(s) with “Pachabel Canon” recording.
* Relay: “Snake” around the room (in seating order) each student plays one measure and the next person in the sequence plays the very next, “in time”.
* Rounds (Independent Part Playing): Set up your class in two or three groups. The first begins a scale on the tonic. Each two bars, another group comes in playing the same scale, on a different line. You can do the same going up and down the scale as each group plays two consecutive lines.
Sincerely,
Rich Moon
40.) Brass Lip Slurs and Woodwind Chromatic Exercises:
“Lip Slurs and Chromatic Warm Up Exercises #1”
One of the opening warm ups I am doing with the U.M. brass players I am working with is a lip slurring “echoing game”. All of these students are having difficulty controlling pitch and slurring “smoothly”, so if they need work on it, I am sure that all of your brass players can benefit from it. The problem was, when I would play “lead”, I would always “glitch” (why, I am not sure). So I made a recording and converted it to an MP3. The students open it in the “Recents” class room and play along with it playing the audio file at their end. No “glitching”. I decided to turn it in to a warm up exercise for your full band class, so I added a sequential chromatic component for woodwind and mallet players. You could even have your “at homers”, log out of the meeting, play along with the recording on their own at home, and then return to the “meeting” once they have finished. It is kind of an “honor system” thing, but NO LATENCY”!
I am also sending you alternate playback recordings along with me playing trombone. One is at 60, and the other at 76 beats per minute, allowing your students to “up” their technique game as they get better at it. There are two variations on this warm up, first is an alternate part for brass players, so everyone can work on the short chromatic exercises in unison. The second, is another of the “Ultimate Musician’s” adaptations, “sneaking in” an improvisation component. You select a brass player to be the “lead” soloist, and as he or she plays along with your metronome, at whatever speed that you feel is appropriate. Your brass players echo whatever that student soloist plays as your woodwinds and mallets warm up on the same original chromatic echoing patterns. Other than “playing only four counts per solo”, the only other soloist’s rule is, that they cannot repeat any slurring pattern he or she previously played. If a soloist does repeat a rhythm, you might take away the soloist role from them and pass it on to another volunteer. Or, you could ask the band class to be the “slurring police” and as the exercise continues, take note on how many times the present soloist repeated any of their patterns. There are several “listening skills” targeted with this warm up, and that added challenge could be one of them.
There are a few other “twists and turns” I have thought of, and I am sure you will come up with a few on your own. If you do decide to try this with your class(es), please share any variations with me that you might come up with. By the way, there was a set of “warm ups” I sent out earlier this year that would be a perfect “follow up”, or “Part 2” to this material. If that would interest you also, but you cannot find it, just let me know.
Sincerely,
Rich Moon
Alternate Brass Parts / Chromatic Exercises:
"playback" 60 bmp
"playback" 76 bmp
"playback" Brass Only
“Lip Slurs and Chromatic Warm Up Exercises #2”
There are some students in the U.M. program that are already “nailing” the “Lip Slurs and Chromatic Warm Ups #1” exercises I wrote earlier, and I promised them I would have an “update” ready for them by this coming week. I just finished it, and now have three different exercise levels completed. They were not really written as a “trilogy”, the 3rd one I did quite some time ago. None the less, there is a basic sequential order to them. I am not sure what I have or haven’t sent so far, so I thought I would send them out as a group. There are audio files your band class can play along with, or you can put up in your Google Classrooms for your students to practice with at home. The listening aspect of this approach is kind of nice. Not only does it isolate an important musician’s skill separately, but also makes kind of a “game” out of it, by challenging your students to replicate what the recording (or a selected student soloist) plays and the other brass players must repeat. Not to leave the woodwinds and percussion out of it, I am sure they can always use a little more reinforcement on the chromatic scale, which I also attempted to incrementally incorporate into this series.
For e-mail size purposes, I am only sending you the PDF portion of the available materials. I will gladly send you out the coinciding audio files (MP3’s) upon request. I am also attaching a “letter of explanation” about a different approach to teaching your trombone beginners. In the U.M. program, I am “going back to the basics” with several of the middle school trombonists I am working with. Even though I used this approach initially for beginners, I have adapted it, and am really pleased with the improvement I have seen with these trombonists and their ability to play “in tune”. It really is all about training “the ear”. I will let the included attachments explain in greater detail, if you are interested.
Sincerely,
Rich Moon
Lip Slurs #2 Brass Part Only
Lip Slurs #2 w WW A & B Combined
Lip Slurs #2 w WW "A" Part Only
Lip Slurs #2 w WW "B" Part Only
Lip Slurs and Chromatic Warm Ups #3 (two pages each instrument):
“Lip Slurs and Chromatic Warm Ups #3”
The following warm ups I wrote for Andre’s band. I am sure it has already been done (or something similar), but I am not aware of everything available in every method book. In my “virtual visits” to several middle school bands in Berkeley County, I am helping out working with students getting ready for honor band auditions. From time to time I sometimes make suggestions when appropriate. If I see a specific weak area, I will also sometimes write something to specifically target that weak area for that specific band. Then I will share it with others, to get a little more “mileage” out of my efforts.
Andre has two band classes in each grade level, one class contains just wood winds, and the other with brass and percussion. Working with one of his trombone players recently, I noticed he had his solo audition rhythms fairly well in place, but had a terrible time finding pitches, and those he was finding, were not well “centered”. I showed him how to play chromatic lip slur patterns, and we played a game, each of us tasking turns as the slur “leader”. Near the end of the sessions we went back to his audition solo and, although there is still a way to go, the improvement in his solo was noticeable. I felt maybe it is something that could help all of his brass players, and a two to three minute period of working on slurring with mouthpieces could help build their embouchure control and range. I know (being an ex-band director) I avoided as much as possible having one group of students just sitting around while I worked with others. With these two initial warm ups (and more can follow if there is any interest) the mallets, can work on their chromatic skills while adding a source of the tonic pitch for the brass players to match. I will transpose the “B” part for all instruments, so if your classes are not split, you can easily keep your wood winds occupied working on the same skill set as the mallets.
Although I envision the exercises developing as follows, you can of course use the warm ups any way you wish:
– Start out with brass mouthpieces only, with the director modeling on a mouthpiece as he plays the exercise (as written) on an available keyboard. For starters, the mallets can play a 7 count “roll” on the tonic pitch every two measures (going down chromatically) if they have not yet mastered the chromatic pattern in part “B”. Everyone playing should release on count 8, every two measures, in order to take a breath and reinforce release accuracy with the full ensemble.
-“Improvisation” (kind of) – The director buzzes (and plays on the keyboard) random lip slur patterns (not skipping over any partials) and the brass students do their best to echo what they hear. Once they get the hang of it, ask for students to volunteer to be the “buzz” leader for some extra fun. During this game the mallets (using the stick end of their mallets) can quietly work on the chromatic notes in their “B” part.
– When their pitch accuracy starts getting close, you can then flip them over to their instruments. Going up to high concert “F” might be a little rough on their instruments, but that is the point of working on buzzing it first. To build the necessary muscle control to eventually be able to perform their upper notes.
I suggest focusing on only one warm up at a time. Again, the idea is for it to be a daily exercise, gradually evolving, with minimal instruction time needed for completion. After your brass master a smooth sounding slur between all of the notes in each phrase, move on to other areas that you needed areas of focus. Note, in the second warm up (in the “B” part) some additional chromatic notes are added to bump their challenge level up a “notch” which coincides with the brass players working up to the high concert “F” partial. The trombone player (I mentioned earlier) also had “range” issues as well, mostly due to lack of support, but also due to embouchure strength. Thank you for your time.
Sincerely,
Rich Moon
Lip Slurs & Chromatic Warm Ups #3/86 bpm.
Lip Slurs & Chromatic Warm Ups #3/108 bpm.
"Lip Slurs and Chromatic Warm Ups #4"
“Extending Intervals, Lip Slurs, and Chromatic Warm Ups”
This relatively basic warm-up targets three areas that students should begin working on by about “mid” middle school years. If you are dealing with brass players only, you should deal with all seven chromatic series steps if possible. If woodwinds participate, having them play as written will work fine for a group warm-up situation. The second part, the chromatic studies, starts with the seven chromatic fingerings for brass, written out so woodwinds can play along as well. In South Carolina, I have found that the ranges required for honor band acceptance are well learned and performed by most band students auditioning. However, if you deviate from the prescribed starting note (or the highest required pitch when coming down), most of these same students are entirely lost. They have mastered the “muscle memory” aspect of performing the chromatic scale but cannot internalize what the scale is and perform a chromatic series from any given initial pitch. That is what I wanted to target with exercise #2. Even after the first six measures (which are written out and transposed for all wind instruments), the teacher has the option of verbally giving their students, or ensemble, additional starting notes and asking them to re-create the same pattern of chromatic notes on their own.
Many middle school band warm-ups include extending intervals, but if you wish to push your students to the next level, expanding the intervals chromatically, both up and down, is one way to do this. Exercise number three is fairly “calm” but gets the point across. However, the fourth exercise takes a bit more effort to master. To break things down a little more, you could start by slowly adding one or two measures each time you play this warm-up. Then, with each run-through, take the needed time to work on the increased interval deviations, along with any notes or fingerings that your students might need to review or learn. I also try to help the brass players internalize the chromatic fingering series going forward as the pitches get higher and reverse when they go lower.
“Lip Slurs Continued” is targeted primarily at brass players but is also transposed so woodwinds can play along as well. Exercise “1C.” continues from the initial page, taking the mid-level brass musicians up into their expected upper register. The length (in measures) extends to force the brass players to take in a larger quantity of air to complete the designated phrase in one breath. In exercises 2 and 3, I gradually get the students smoothly slurring through “double partial” skips. Finally, in the last two exercises, having the students go right at the “double partial skips without any transitioning notes, first in half, then in quarter notes. For brass players, there is an option to continue down the chromatic fingering series if desired. The idea is to work on flexibility and control. If using a metronome, insist that (in all cases) the SOUND occurs right on the “click.” Avoid “dipping up” into the pitch or any hesitations where the pitch is not sounding right on the pulse. The attached two sheets are part of a series of exercises for the “Ultimate Musicians” program I am currently fielding for middle school band programs. As always, any comments, feedback, or suggestions are appreciated.
Thanks,
Rich Moon
Lip Slur Warm Ups #5, "Double Partial" Skips
This new lip slur sheet continues the “slurring” section in the “Lip Slur and Chromatic Warm-Ups” I posted earlier. Warm-Up #4 is probably one of the most active sheets I have used with my middle school students in the “Ultimate Musicians” program, especially for the brass players. It targets three key areas and offers challenges for all three at different levels. “Lip Slurs Continued” picks up at “1C.” adding the high concert “F” to the brass players slurring range.
Next, I wanted to target an area rarely approached with middle school brass players, “Double Partial” skips. It is also another part of my series of “Extended Interval” warm-ups, but with the added dimension of “slurs.” Playing accurately and SMOOTHLY through this warm-up is a challenge for most 7th & 8th graders. Even if they got this, its benefit as a warm-up, reinforcing embouchure muscle memory (along with jaw sets), and “tricky” interval skips cannot be denied. There are a series of MP3 Finale “play-back” recordings I converted from “midi” files for three basic brass instruments; bass clef, trumpet, and french horn. I would e-mail the appropriate MP3 (along with the exercise) to students I felt were ready. Students played through the exercise sheet along with its corresponding recording at home. Note: There are eight “tonic” quarter notes (“click-track”) given before each exercise number. I have attached the “PDF” combination file with all instrument transpositions, so it (or a portion of it) could be used as a full band warm-up and review.
Coming up next, “Lip Slur Duets.” See you then.
Sincerely,
Rich Moon
"Double Partials" Bass Clef
"Double Partials" Bb Inst.
"Double Partials" French Horn
Lip Slur Duets #6
When working with students “virtually,” I usually have between 1 to 3 per session. Since I write a lot of my materials and “present” them in Google Classroom, it is difficult for any more than that to see the screen (unless a second chrome book is used.) I prefer to work with two students, and I find it more effective than even a single-person session. Students often do not realize the mistakes they are making until they see a peer making a similar one. Possibly, a moment of realization when the observing student thinks, “Oh C _ _ _ maybe I’m doing that same thing wrong.” I also like working in pairs because students can shift roles from the performer to the observer, allowing each to approach the targeted task from two different directions. I will assign them such tasks as being; the tempo giver/observer, counting the number of errors heard, or critiquing and giving their suggestions on how the student’s performance can improve.
One of the most important tasks I sometimes give to the “observer” is being the “foot police.” Since I can only see most of them from the waist up, I have NO idea what each student’s foot is doing. As one student plays, the other listens to the metronome on the chrome book and tells me:
- ) If the performer is even tapping their foot.
- ) Is the foot-tapping at the same time the metronome is “clicking.”
- ) Does the performer’s foot hesitate or speed up.
Students will sometimes slow a little on the more complex rhythms but then recover and get back with the metronome later (being “in and out of phase” more-or-less.) This information is valuable for me when trying to figure out why mistakes are possibly occurring and what strategies I might use to fix them. Another way I can observe each student’s ability to keep a steady tempo is to have the students use their “thumb” to keep track of “down” and “up” beats. I will be discussing several ways to use the “thumb” (and “thumb counting”) in a future article that is to be published in a later issue of the NAfME journal.
I primarily wrote the “Lip Slur Duets” to work with the groups of two brass players. Once they perform single-line exercises accurately, I then have them play independent lip slurring exercises. I determine if the pair is ready to move on to the next level by if the sound of each pitch occurs precisely on the metronome “click.” When students begin working on lip slurs, you usually start with many missed pitches and “air sounding before the pitch occurs. When their timing and pitch accuracy come together, you still want the benefit of lip slurs as a warm-up, but you also want to push your students up to a higher performance level. Adding the “independent part playing” process is one way to do this. Each musician has a finite number of processes they can combine at one time, and I refer to that as each individual’s “processing number.” Performers can simultaneously perform that number of tasks, but when each goes beyond that limit, students tend to “crash.” Some tasks are more challenging to process than others, so I think of each task value as a “full” or “half” process. As teachers, we are always looking for ways to expand our students’ processing abilities to make them better and more confident musicians.
Sincerely,
Rich Moon
Duet Top Part
Duet Bottom Part
Duet Both Parts
41.) The Clarinet "Break":
For individual part transpositions, click on image below.
"Flexibility Exercises and Clarinet Break" version #2 (saxophone parts revised):
42.) Scale and Rhythm Exercises:
Brian Trauger at Sagaree Middle uses a lot of my counting teaching materials, and asked me if I had any of the “Rhythm Masters” units that were designed to also reinforce the seven different junior scales required by SCBDA. A long, long time ago, I wrote the “Scale and Rhythm Studies” for just that purpose. These may not “match up” with where your students are at present (rhythmically speaking), but if you have a use for any of them, have at it. These have been used in the past by several high schools that found them to be a very comprehensive “QUICK” review for these two subject areas combined. Note: In all “wind” parts the top exercise is in concert Bb and the bottom is written in one of the other six the keys required by SCBDA. These include concert F, Eb, C, Ab, G, and Db scales.
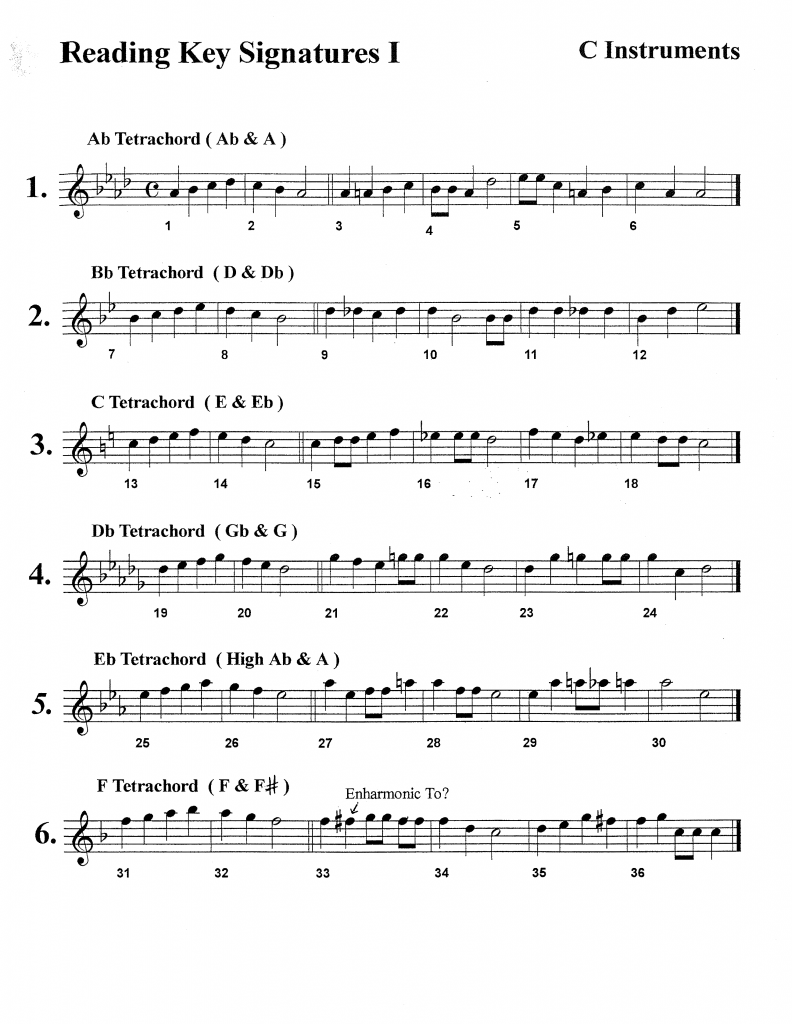
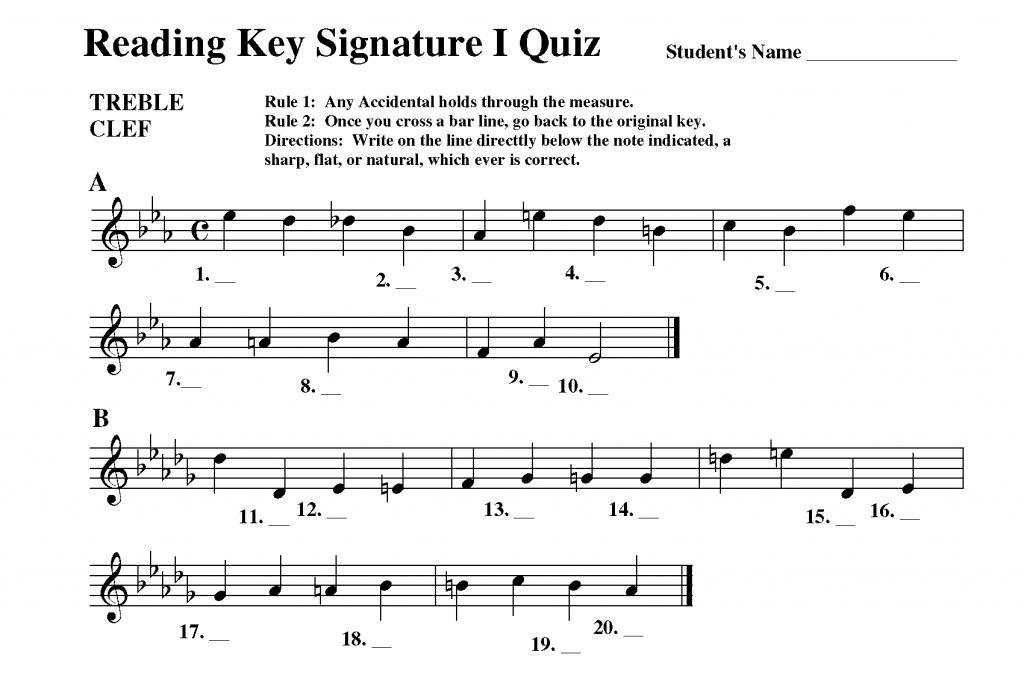
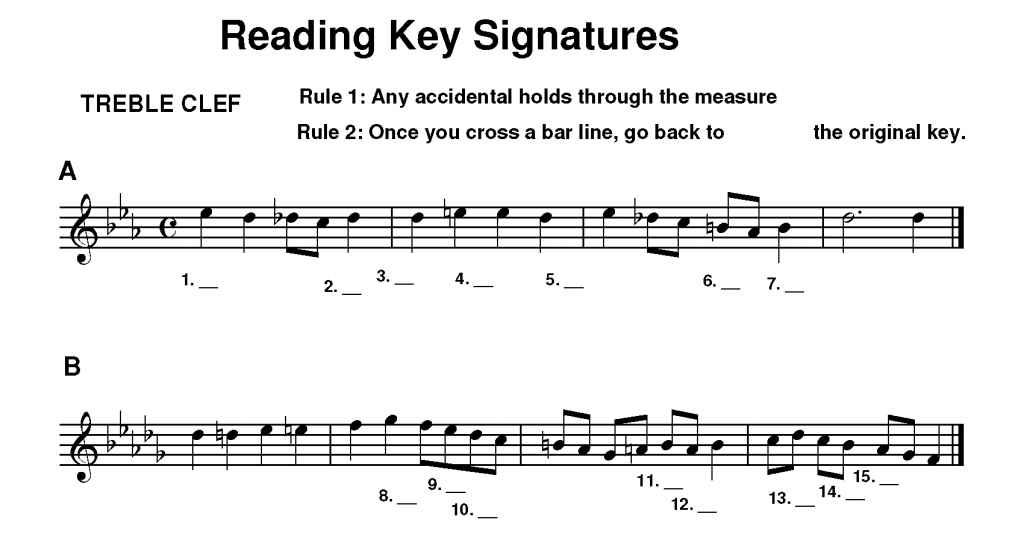
43.) Reading Key Signatures:
Dear Directors,
As I have been working with bands, I have found some confusion among students with “reading key signatures.” Many directors encourage their students to mark their music with notes that they miss or seem to give them trouble. I also believe in that, but I have witnessed student parts marked where trombone players have written the #3 above or below every A and E in their music. However, the song was in the key of “F.” I am sure everyone has covered this subject with your band classes, but I can guarantee you method books do not do enough repetition in this area to be effective. I thought I would try to help out and come up with a quick tool to help you assess your band’s “key signature and note identification” skills.
I had two thoughts when I put this sheet together. 1.) Put it up on the smart board and occasionally do one line a class or until you are comfortable with their ease and confidence in identifying the notes questioned in any given line. I could not figure out a way to transpose the exercises so all instruments can play it and still allow you the simplicity of using the tool without dealing with “transpositions.” 2.) If you have a substitute scheduled, they could pass this out as an assignment or a quiz. It will give you feed back of which specific area of reading key signatures is giving them trouble. You could even make out a key and ask the substitute to grade it. I was trying to decide if I wanted to do a “check on the correct line” or draw a natural or flat answer format. I decided to use the first (in case you were using it with a sub.), but you could also require students to “draw” the correct symbol on the correct line if you wanted to. I also have used “mapping” arrows to physically demonstrate how your student’s eyes should read and interpret key signatures. I left #6 clean (without “eye scripting” arrows), thinking that, on the smart board, you could ask students to draw arrows to the first of each note affected. For advanced students, you might even have one soloist play a line and ask your band students if they could tell if the soloist made any errors just by listening, although that might be asking a lot for middle school.
If this “Key Signature…” helps, and you feel you could use more examples, let me know, and I could also expand the key signatures used. These six lines should be enough to check out your band’s present “reading key signature” health.
Sincerely,
Rich Moon
“Reading Key Signatures” (or “RKS”) is a “fast track” way of teaching musicians of all ages, the basic rules of using sharps, flats and naturals with any given key signature. There are only two basic rules and the series is done at two different levels. Each level has a written exercise, a playing exercise, and a short written quiz, to “cap” everything off. There is even a single updated set of exercises that has every note in each exercise “numbered”. The thought here was to streamline and simplify communication between teacher and students in its execution. All files for this resource are available as PDF’s, there are no audio files.
44.) Key Signature and Scale Exercises:
Key Signature Challenge #1
Key Signature Challenge #2
45.) "Six Rhythm Categories in Six Different Keys"
“Six Rhythm Categories in Six Different Keys”
Working with your students in the “Ultimate Musicians” program over the past several months, I have made several observations and notes in my efforts to help your students get ready for All-County and Region Auditions. First, I have targeted several different categories that I noticed have been given your students some problems. Second, are mistakes in prepping and reading key signatures in sight reading etudes. I sometimes feel that students who are solid with the memorization of their seven scales, are “over confident” about their ability to read key signatures. I personally believe those are actually two different skill sets, and need to be addressed in separate ways. Finally, I notice that “interval skips” happen more frequently in audition sight reading etudes, than most of your students are used to seeing during your regular band classes. I wanted to address that issue as well expose your students more frequently to them, prior to the upcoming Region Auditions.
I have been playing around with different ways to address these concerns in a very concise and somehow sequenced fashion. With one week left prior to Region Band Auditions, I came up with “Six Rhythm Categories in Six Different Keys”. I know there are only 5 days left, but I did not think of it until after “winter break” started. I wrote six examples of each rhythm category I decided to target, and wrote each example in a different key signature. The examples are only two bars in length to really shorten the review time needed and minimize class time from your already planned instruction. I suggest a brief pause after each two bar exercise to critique and/or praise student’s work. I also skipped the key of concert “Bb” in order to save time, figuring that most students auditioning are very solid with that particular key signature already.
I do not know if this will be of any help to you and your students, but I wanted to come up with something that might be useful and present it to you. I tried to predict what your students might see at region auditions and write it to as close in difficulty to that as possible. If you think it might help out, I have included all of the instrument transitions. When you get a chance, please let me know what you think, and if you do use it, if you thought it was any help to your students.
Sincerely,
Rich Moon
843-875-5594
6RC&6DK MP3 60 bpm
6RC&6DK MP3 72 bpm
6RC&6DK MP3 84 bpm
"Six Rhythm Categories in Six Different Keys" (slightly harder version):
46.) Audition Sight Reading "Boot Camp"
47. ) Enharmonic Note Studies:
The next two issues probably do not occur often, but I assure you there are some students having problems with them in every middle school band, and even some high schools. First, in the “Ultimate Musician’s” program, I noticed a couple very competent musicians, playing four “beamed” 8th notes as four 16th notes, especially if they are both written in the same exercise. These students may not have been paying full attention the day you taught it, but one reason for that is probably the two rhythms were approached months, or possibly a year apart. The students (on their own) interpreted four notes connected together as always being 16th notes. They missed the whole “double bridges” thing completely. The second, I refer to as syncopation “rhythm ratios”. I noticed this problem consistently reoccurring the many years I spent judging honor band auditions. When I started writing audition sight reading materials for county and region honor bands myself, I set these up as situations in my own arranging (especially at the high school level). I found these “traps” an excellent way to separate the “pretenders” from the “contenders” when it came to rhythm reading abilities. What I noticed was, students would play a dotted quarter + 8th note, and a dotted 8th + 16th note exactly the same. They are reading the “rhythm ratios” correct, but are being inaccurate with the rhythm “time lines” they are applying the ratio too. This sheet targets the three main “syncopation” categories in the first three exercises, and then mixes them up in the following three. “Family Trees in Different Keys” Part 2, is a high school sheet I did on this, but in the “Pre-Family Trees” I simplified things to introduce in middle school, and stuck with the key of concert Bb.
49.) Reading Multi-Meters:
49.) Reading Interpretation Assessments:
50.) "Pre-Family Trees" and "Rhythm Ratios"
Several years ago when I was doing my “No Fear” rhythm camps, I noticed several students had difficulty in differentiating subdivision levels. They understood the “rhythm ratios”: 3 to 1, 1 to 3, and 1- 2 -1, but I could set up a sight reading etude and get them to “trip up” a rhythms subdivision speed. Please give this sheet a try and see if they have any problem performing pulse, subdivision level I, and subdivision level II, in the same exercise.
Sincerely,
Richard Moon
"Family Trees" Part 2 in Different Keys:
Click below to access all instrument transpositions.
51.) "Rhythm Masters" (plus) Independent Study Program:
52.) "Dimensional Time Line Transfers" - Dashes, Dots, Digits, and Dits
"T.L.D.T" Part #2
"Time Line Dimensional Transfers" Page Re-Direction:
“Time Line Dimensional Transfers”
I have included the two articles that introduce the concept behind “Time Line Dimensional Transfers” and the importance of exploring and differentiating student’s learning styles when it comes to counting and reading rhythms. The “Ultimate Musicians” page is already “lengthy” and I have not yet added new content created during the 2022 – 2023 school year. For that reason I have decided to re-upload the two articles and then the following corresponding content onto their separate page. Please click on the URL link below to be directly taken there: