Transitional Keyboards Part 3
What is the “Un-Think” process?
Although the idea is really taught form the very beginning of a young jazz musicians journey, the following statement makes more sense after they have also begun instrumental instruction at the middle school level:
With Concert Band you “Think” music. With Improvisation (jazz) you “Un-Think” music!
It is tough, breaking a young, well trained musician, of the habit of always being told what to play and being able to know exactly what you are expected to play next. However, improvisation is less effective (or downright boring) if the element of randomness and spontaneity does not exist in its application. Initially, most “rough spots” occur when the young soloists attempt to calculate (or plan ahead) what they are going to try to play next. If the early improvisationalist gets used to the “NO SKIPPING” rule, the “what pitch” or “what note” to play next is pretty much taken care. In the initial phase of learning to improvise, the performer only needs to make up or create one element. That is the rhythmic element of an improvisational melody. Being able to focus on “one dimensional” playing can simplifies things greatly, and avoids any confusion when the brain is switching back and forth from composing “what notes to play” to creating the rhythm aspect of an improvisational melody.
Besides, Un-Thinking your rhythms is an “easy sell” to middle school students, since “sight reading” is an element in concert band most of them fear most. I put it this way: “How many of your other classes here at school will give you a test, and, you get in trouble (or get a low grade) if you ‘think’? Put another way, you will only get an ‘A’ for NOT THINKING when you take your test. You really gotta’ love jazz band!”
Weird, but True.
"Hold 'em Up" Cards:
“Hold Up Cards” Set #1:
When playing unison notes, or a “blues” scale, as the teacher holds up a different card, the group changes the style and rhythm they are performing in.
“Hold Up Cards” Set #2:
As you are playing a jazz warm up that is already notated, students will switch back and forth from a “duple” to “triple” meter interpretation, as the teacher switches out cards.
The First 6 Instrument Notes and the i-Pads Grey keyboard:
When first starting out soloing on wind instruments, students can choose to play on either their instrument (using the previous Transitional Keyboard maps), or my i-Pad (using this “overlay” sheet). When soloing with wind instruments is first attempted, I do not want to pressure students until they feel ready. By this time, all of them are confident soloing on the i-pad (it being so easy), and this map reminds them to ONLY improvise from one neighbor to the next. As we continue opening up each class or practice with a general “jam” session, members can make the soloing transition whenever it finally feels comfortable to them.
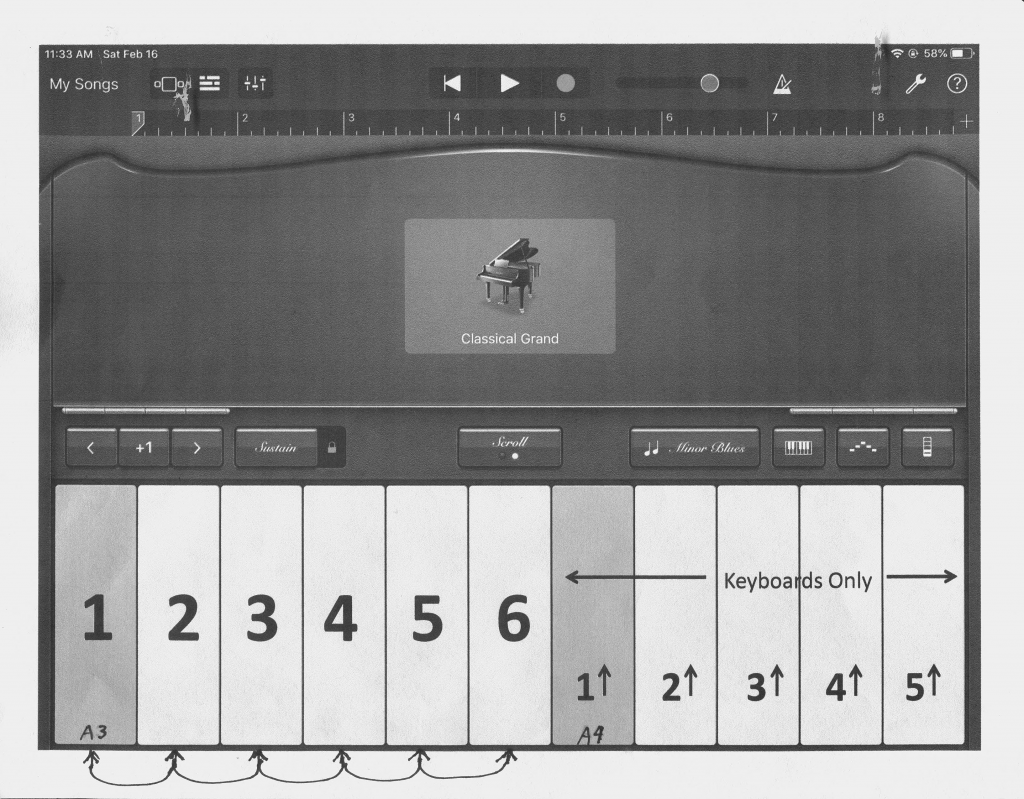
I-Pad grey keyboard overlay sheets for the first 6 notes of the A minor and G minor “blues” scales.
Improvisation Region Warm Ups #1:
Improvisation Region Warm Ups #2:
Beginners Introduction to "swing" and "rock" Jazz Styles:
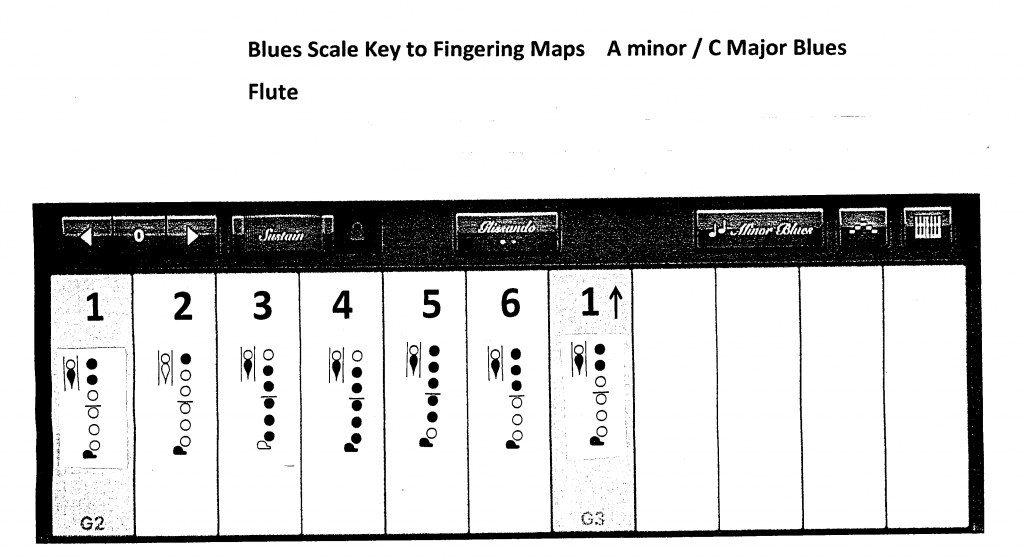
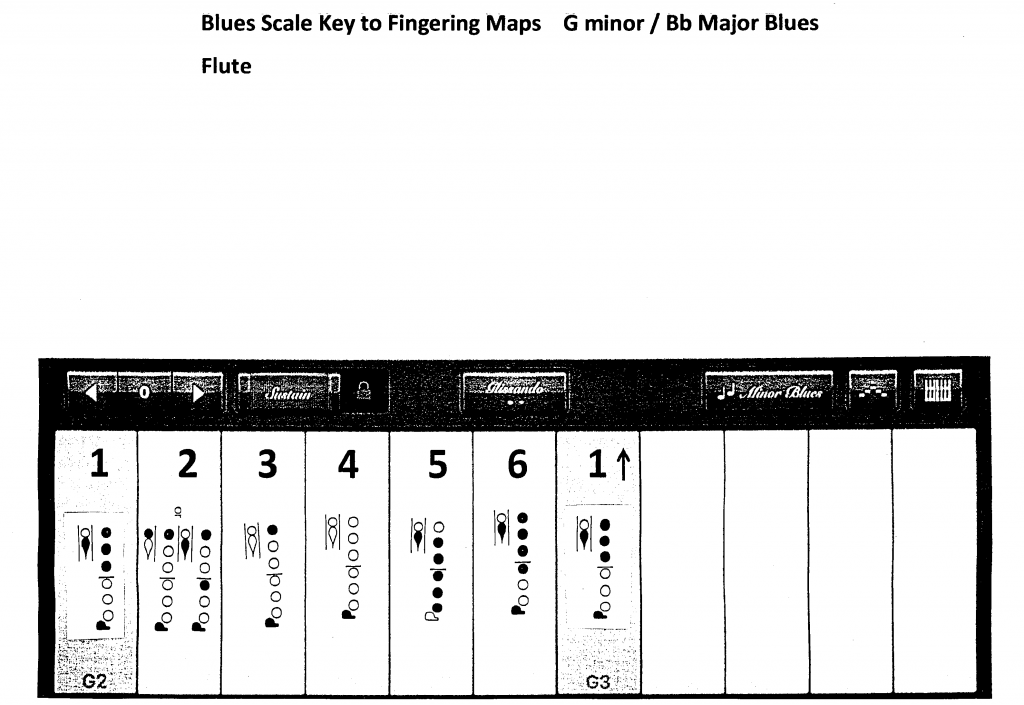
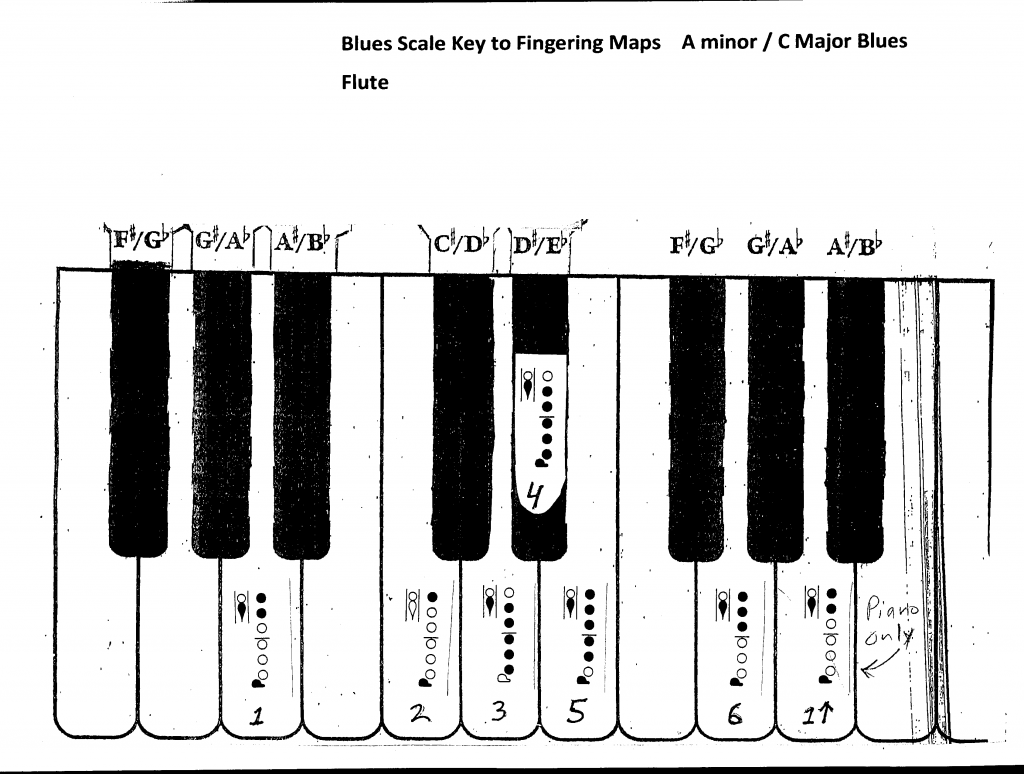
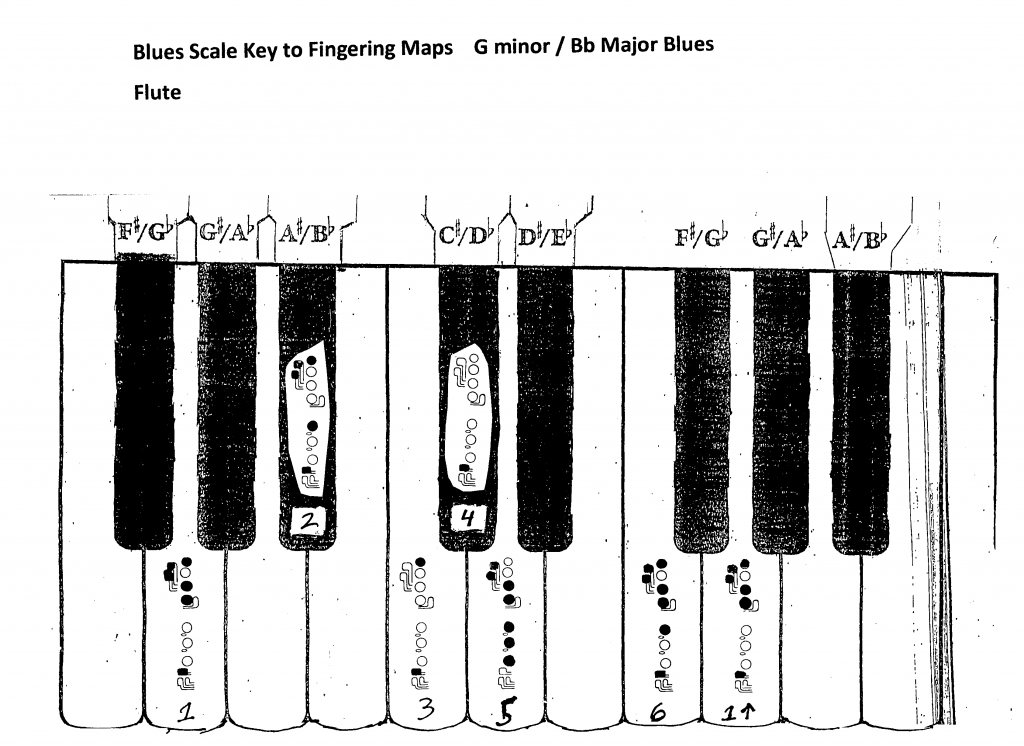
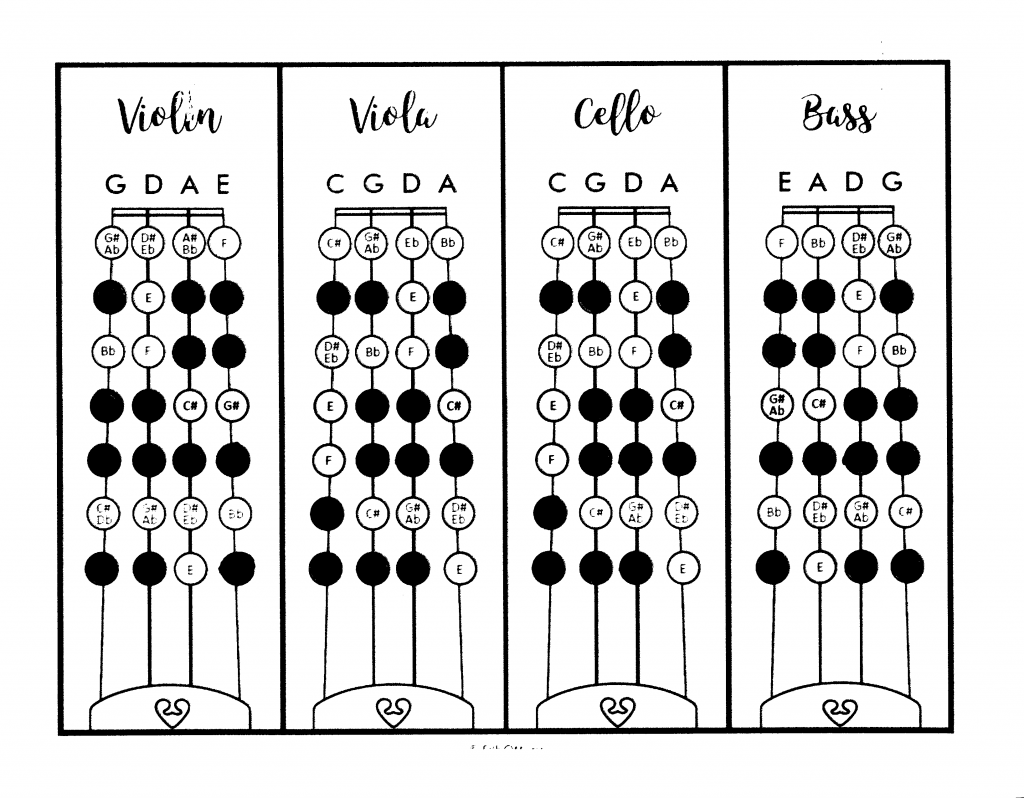
i-Pad Grey Keyboard to Instrument Fingering Maps:
"Click" on the Images Below to Access All Instrument Blues Clocks:
Black & White Keyboard to Instrument Fingering Maps:
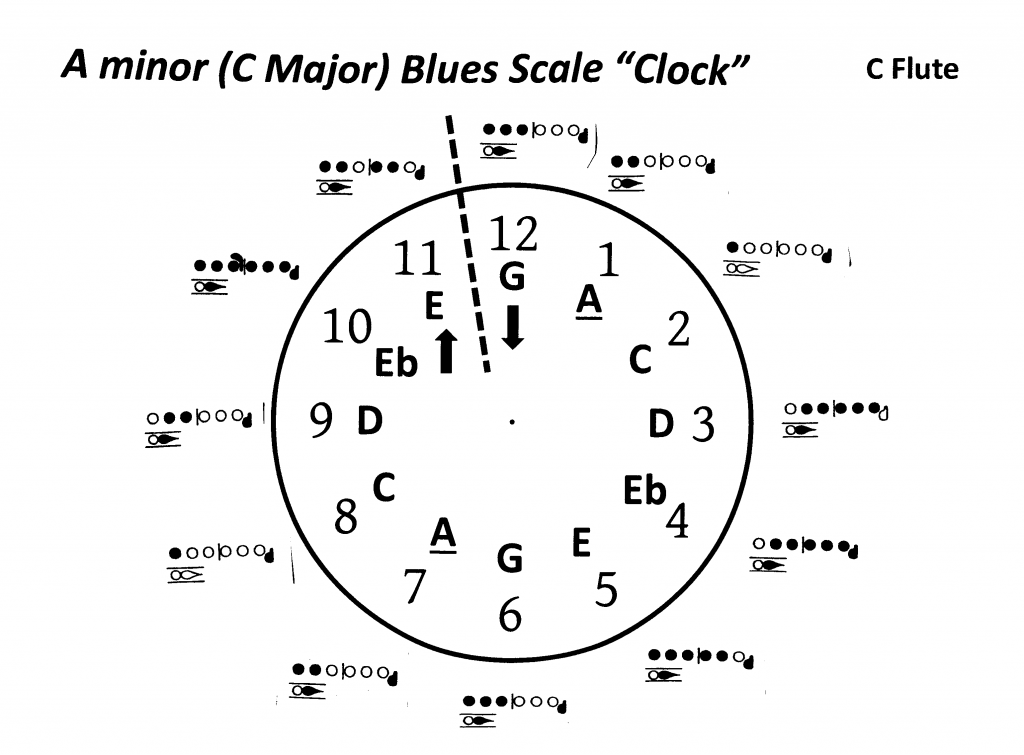
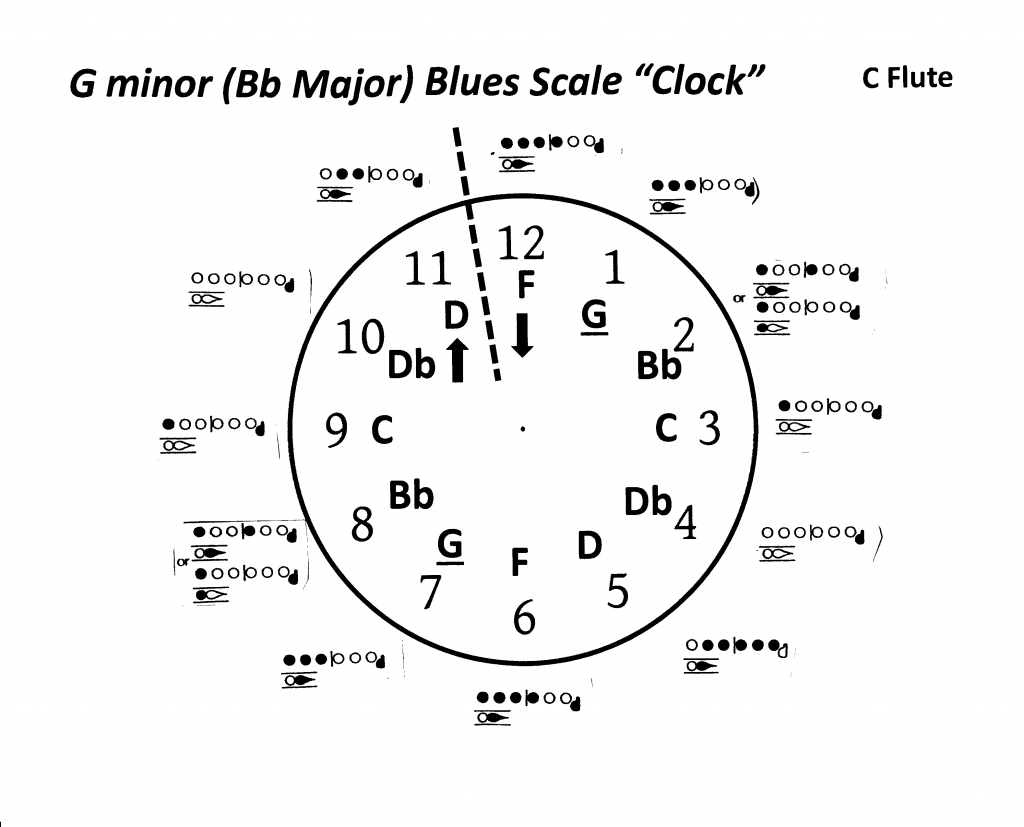
Single Instrument Fingering "Blues Clocks":
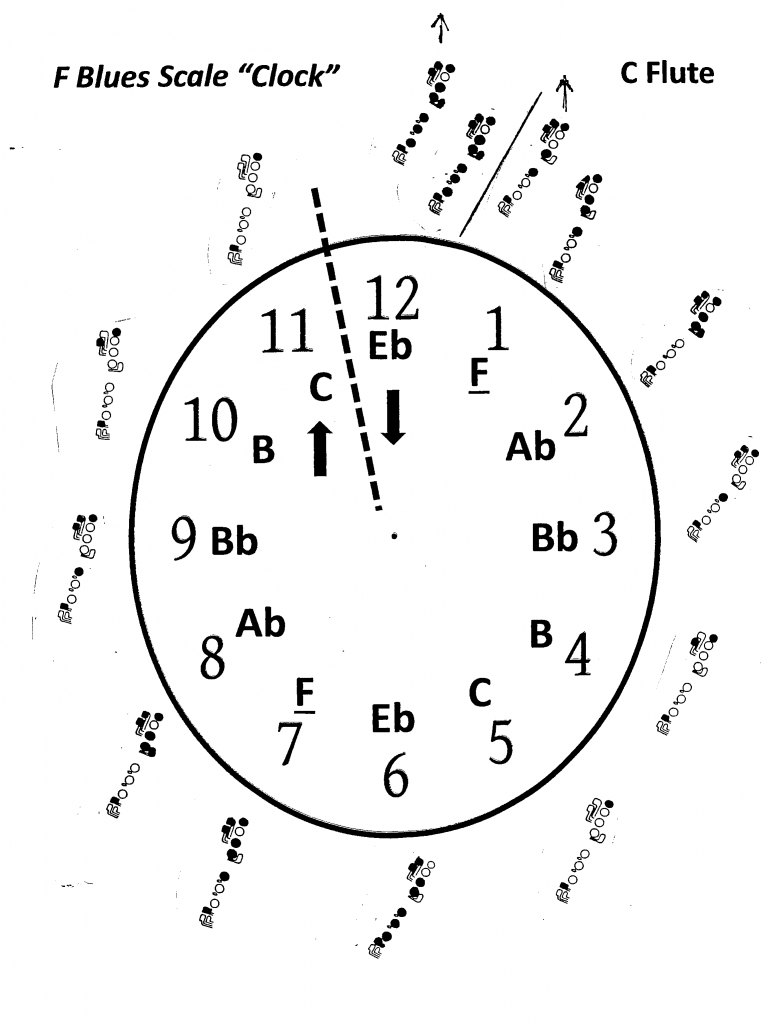
“Introduction to the ‘Blues Clock’ Visual Aide for Improvisation”
The idea of the “Blues Clock” is to allow all band instruments to experience the fundamental workings of the major and minor blues scale. For note selection you want to keep things simple, and somehow find a way to prevent kids from “skipping” all over the place. Students can understand, and even visualize, how a basic clock works, so going around the clock (in either direction) will help create a nice diatonic back drop from which beginning students can create improvisational solos with.
Each instruments “fingerings” for each note of their blues scale is displayed around the clock, so the student does not have to think “through the staff” in order to confirm which are the correct notes in that key’s scale. This is especially helpful if you wish to introduce beginning band (6th grade) students to the concept of improvisation, even as early as mid-year. At any rate, students being able to directly refer to his or her fingerings, eliminates at least one “process” and helps students with fluency much earlier than normal, in the learning sequence.
Also unique about the “clock” is the range flexibility. Since you can reverse direction whenever you want, students can play around with as many (or as few) notes as they wish to, and still sound good. The ranges on these clocks easily cover band students, from the very beginning, through High School. Finally, you can use the clock as a tool to introduce “jazz” and “improvisation” to your concert band(s), to help create interest and recruit future jazz band members. Even the more “exotic” instruments, like French Horn and Oboe, can participate, and you may eventually interest them in learning a second instrument in order to be in the jazz band. Later, I will design a “three ring clock” which will spell out the I, IV, and V chords of each major and minor blues scale. There will be no fingerings on this clock since, at this time, students should not need the added aid of instrument fingerings being visible. The advantage to the “three ring clock” is (as students move randomly clockwise and counter-clockwise on the clock) when it is time to change the chord, the child simply “slides over to the next ring one hour forward or backward. This allows students to smoothly transition from one blues scale to another, and still avoid any excessive skipping.
All the above being said, the students now can focus on the only one aspect left of the blues improvisation process. While eventually the correct notes of the scale, and which note “should come next” gradually becomes on “auto-pilot”, the student’s ONLY responsibility is to now come up with different, interesting and random sounding “rhythms” (without repeating any). This will be the first year, I will be using the “clock” with the present schools I am working with, when I feel each is ready. We will then see if the tool is as effective and efficient as I envision it to be.
Sincerely,
Rich Moon
moonerk@bellsouth.net
843-875-5594

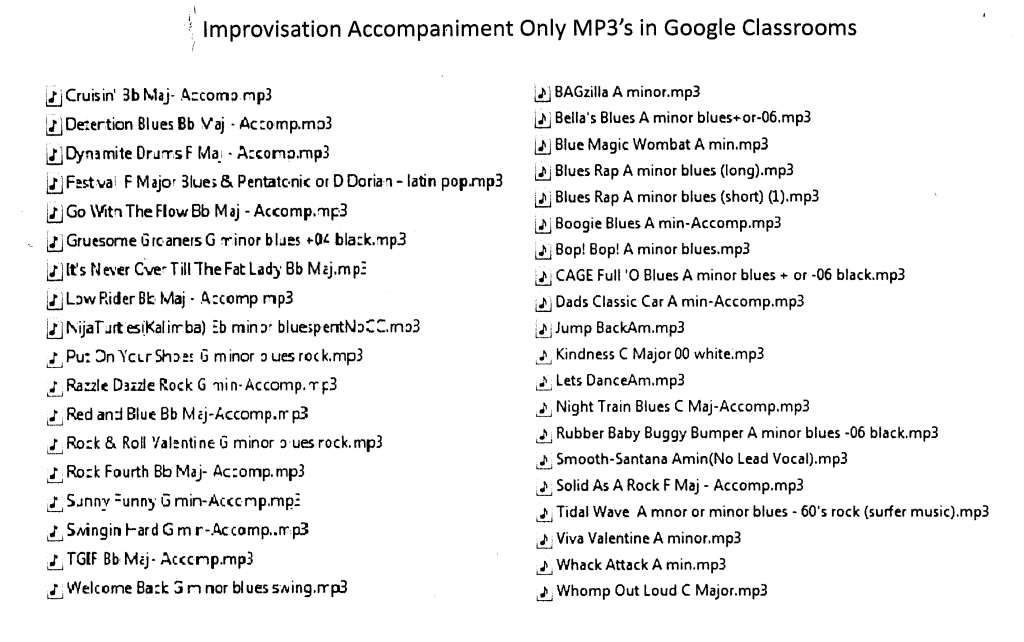
Improvisation Accompaniment Only MP3's for Bb Major/G minor & C Major/A minor Blues Scales:
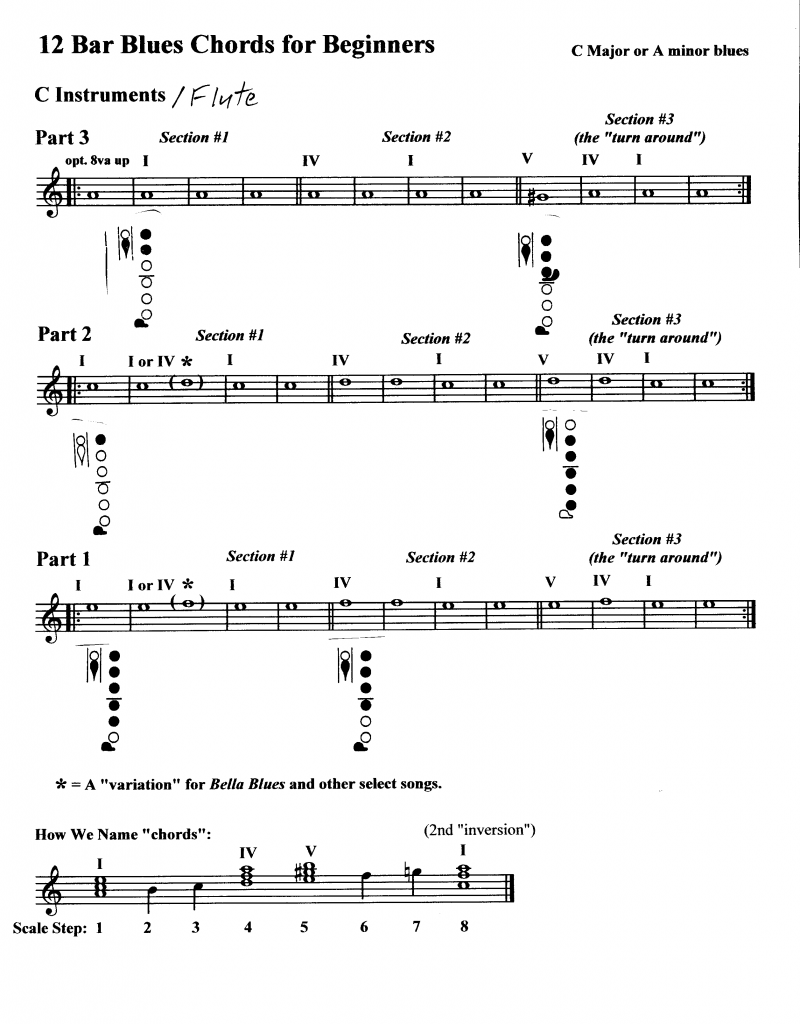
12 Bar Blues Chord Progression for Beginners:
12 Bar Blues "Color Coded" Chord Progression Chart:
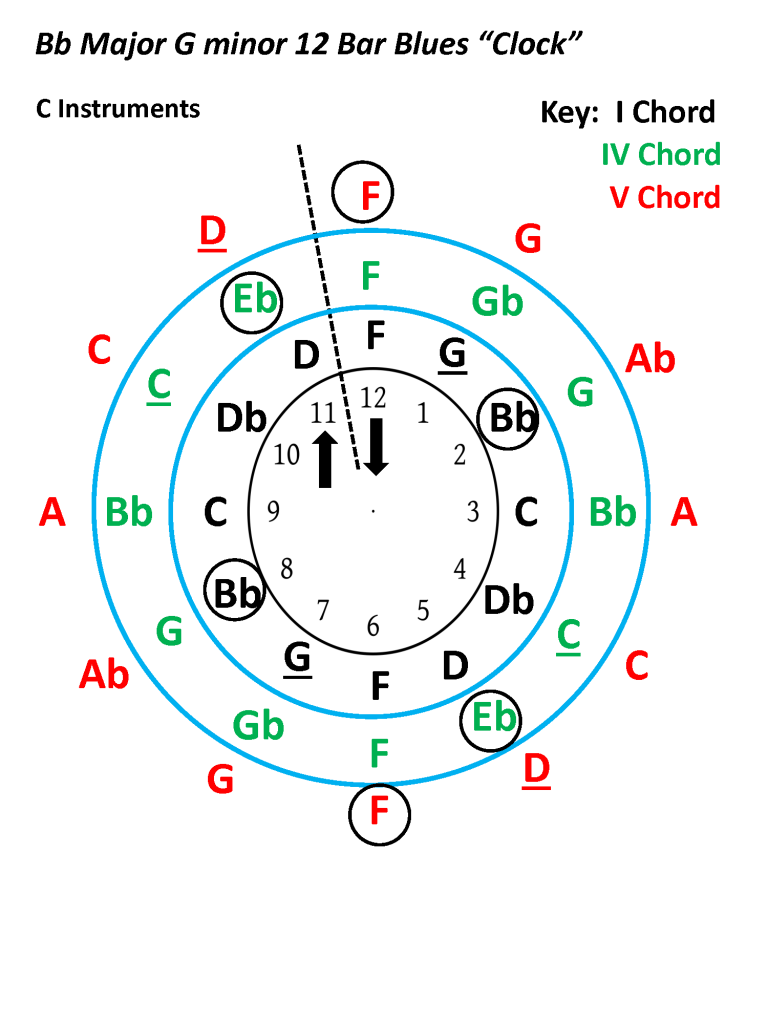
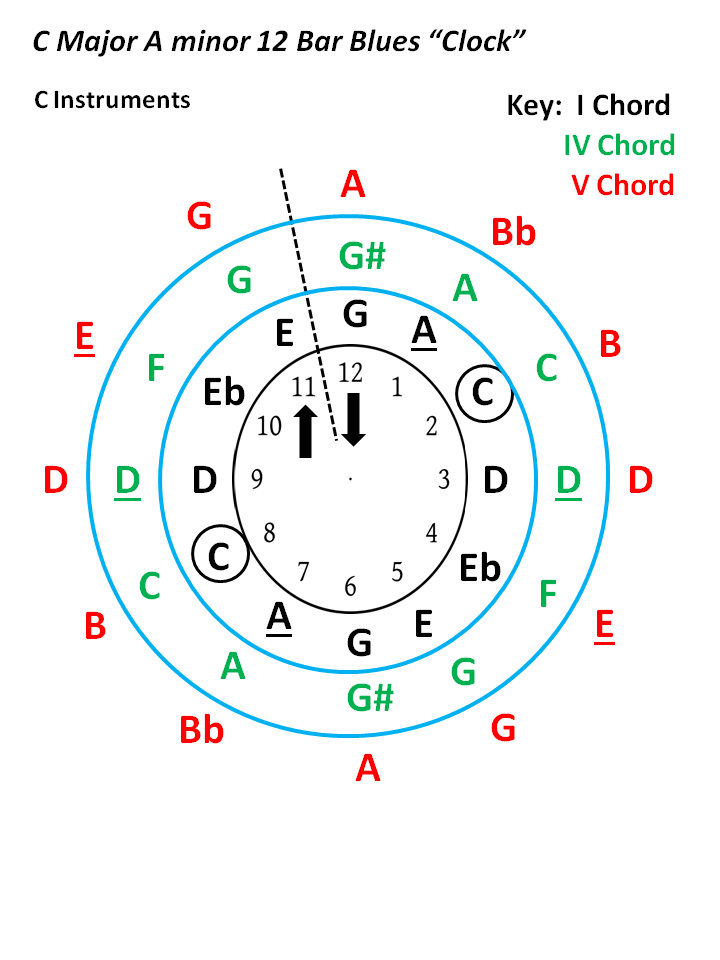
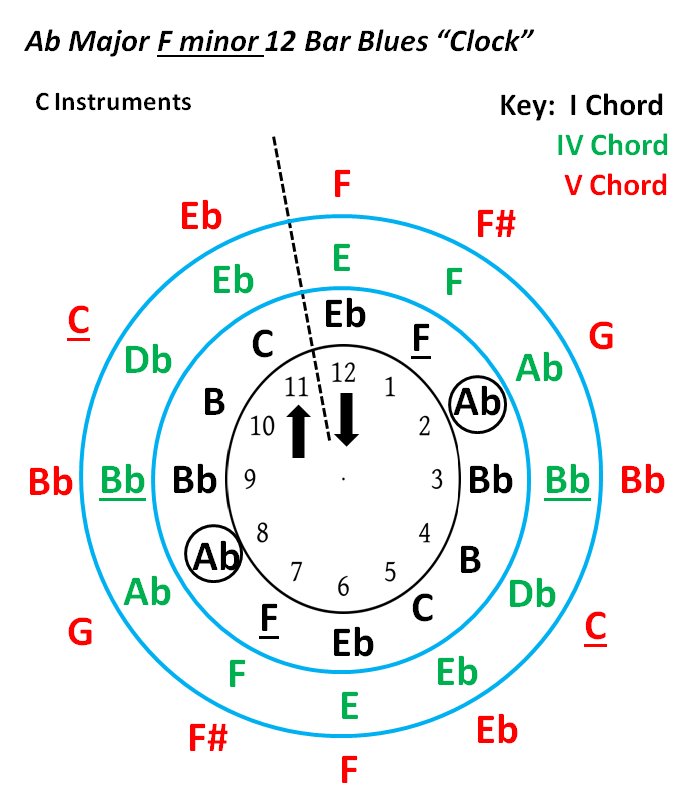
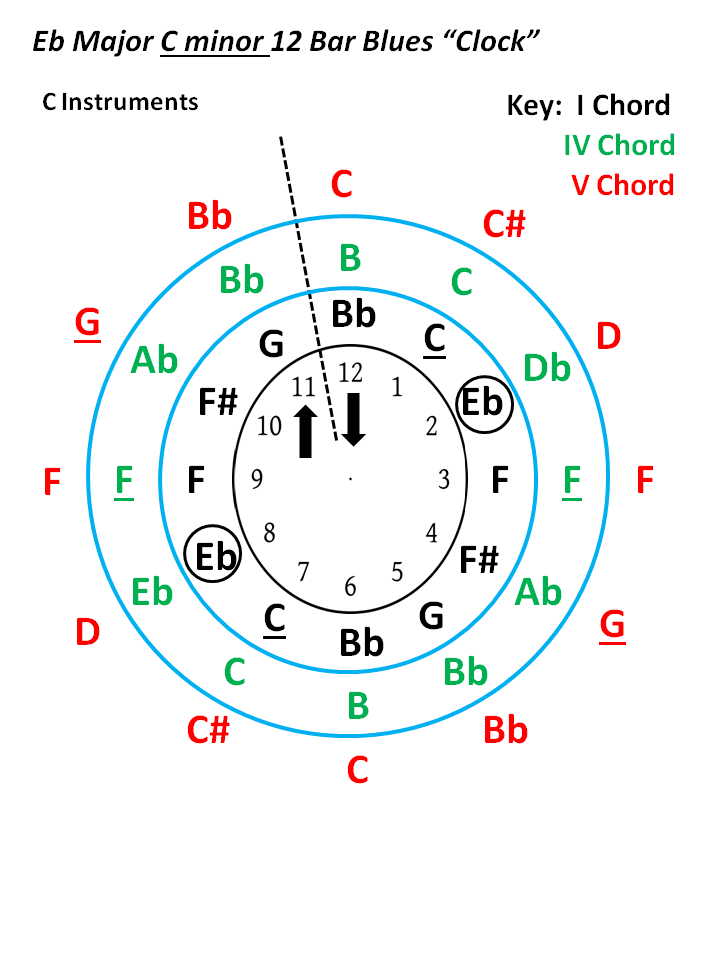
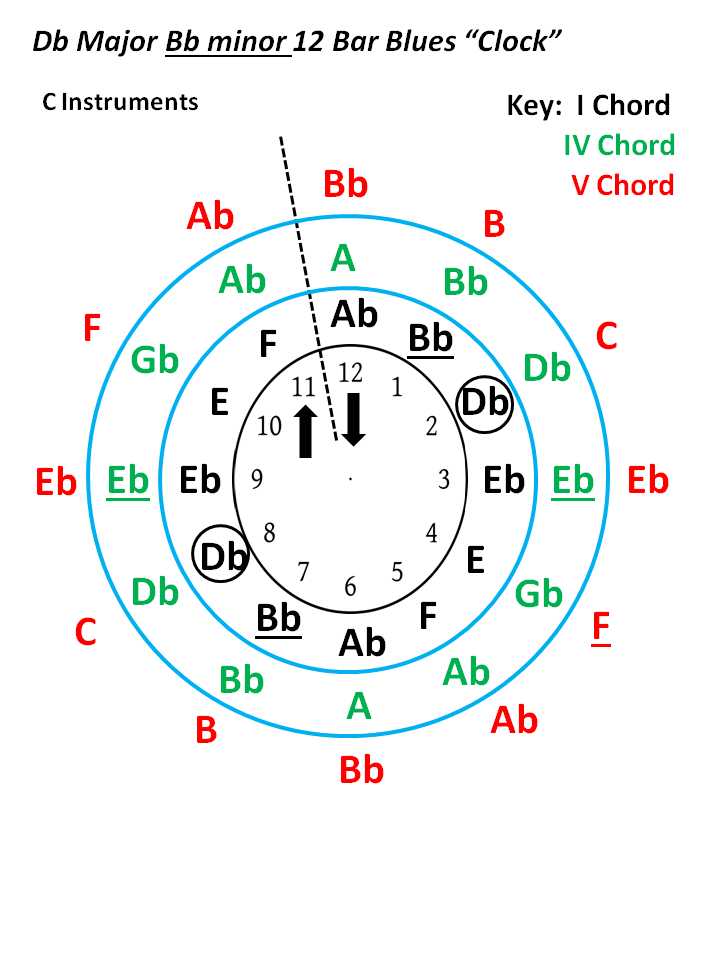
The 3 Ring Color Coded “Blues Clock”, and How to Use It:
The “Three Ring Blues Clock” is designed to help students transition back and forth between the different “blues scales” used by the I, IV, & V chords. To make things even easier, the chords (and their “blues scales”) are color coded to help our young musicians visually transition between them. The code is; black for the I chord, green for the IV, and red for the V chord. While traveling clockwise or counter clockwise around the clock, let’s say starting with the I chord’s “blues scale”, when you switch to the IV or V chord, move to the note straight across (the same hour on the clock), or slightly forward or backward onto the new “ring” or color you are next going to improvising in. What I mean by “slightly” is “+” or “-“ one, or at most, maybe two hours on your clock.
Before doing any improvisation assignments using the “three ring clock”, practice using the “12 Bar Blues I, IV, & V Seventh Chords in Bb” sheet. It is designed to help you transition back and forth from the three different chords, every 8 counts. The pattern is always: I, to IV, to I, to V, and then back to I. Obviously these transitions are pretty flexible, and there are several choices that will sound pleasing to the listener’s “ear”. What you do want to avoid though, are any large “skips”. The closer the transitioning notes are to each other, the smoother the chord changes will come across. A soloist can improvise along with the included MP3, or if there is more than one player, take turns soloing as the other(s) play the quarter note chords for support. If there are more than two students participating, divide the four notes of each chord up between the additional players.
If you are having difficulty visualizing what I am talking about, watch the attached video. I use a straw (as a pointer) to model the transitioning motion I am talking about on a “Blues Clock”. Your transitions will be a little rough at first, until you get used to using the clock in this way. Eventually though, this tool will help you create “seamless” chord transitions, without even having to think about them.
You can also use the “Bb 12 Bar Blues Progression Notation” sheet in a similar way. With this tool you “slide” across the three different chords on your instrument’s staff, transitioning up or down (one, or at most two) staff lines or spaces, to the new “blues scale” you are shifting too. Note: The “whole notes” designate the basic blues scale (starting with the tonic) that is in the most comfortable range for your instrument. The “filled in” note heads (quarter notes without stems) are extensions up and/or down from that chords “blues scale”, which are within a reasonable “reach” for most students. Of course, when you are improvising, only go as high as you feel comfortable with. Avoid playing too low in that the sound gets “muddy” and the quality of your tone is not as nice. The less experienced soloist will probably find the “clock” a little easier. However, play around with both tools and decide for yourself, which works best for you.
3 Ring 12 Bar Blues Color Coded Blues Clocks:
Below is a "Strings" Bb Major / G minorBlues Clock (kind of) I am experimenting with:
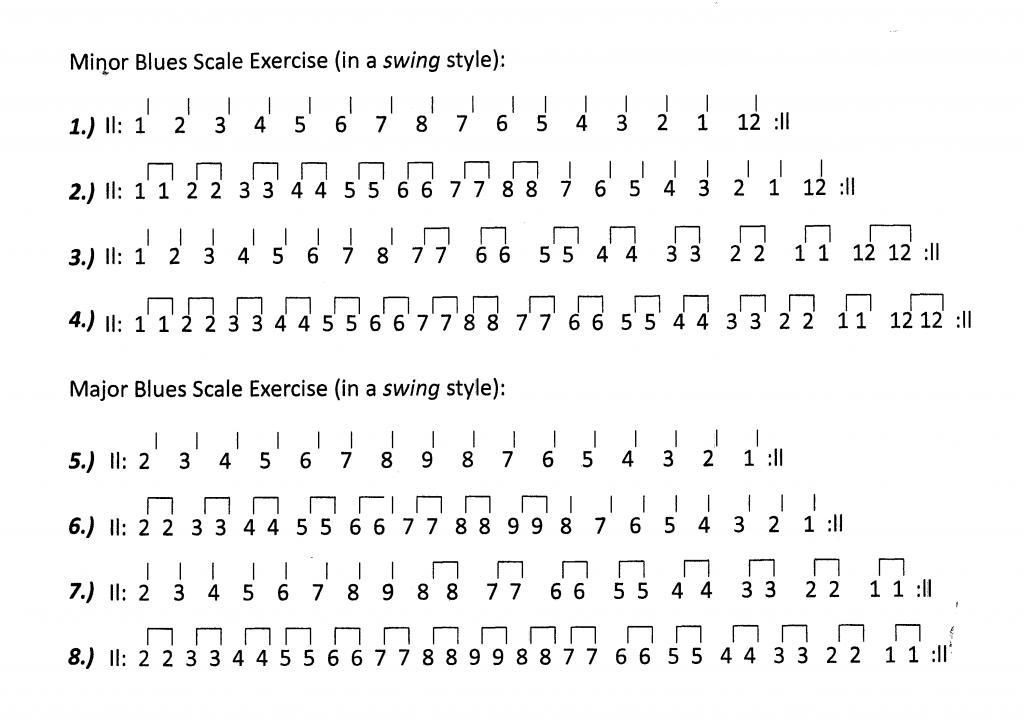
Major & Minor Blues Scale Exercises:
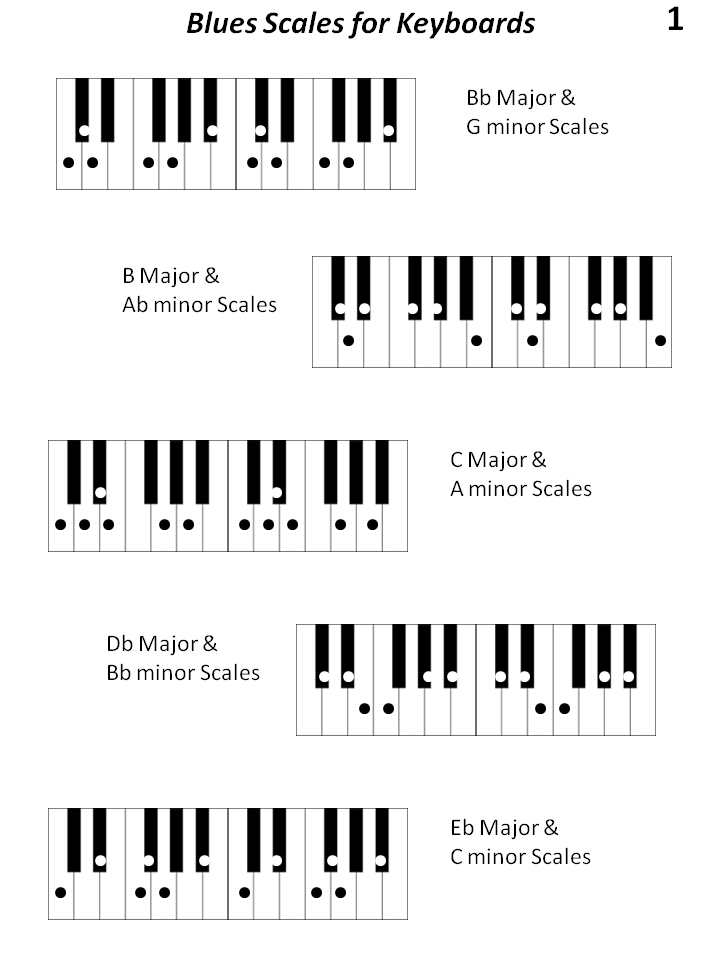
7 Major and Minor Blues Scales for Keyboards: