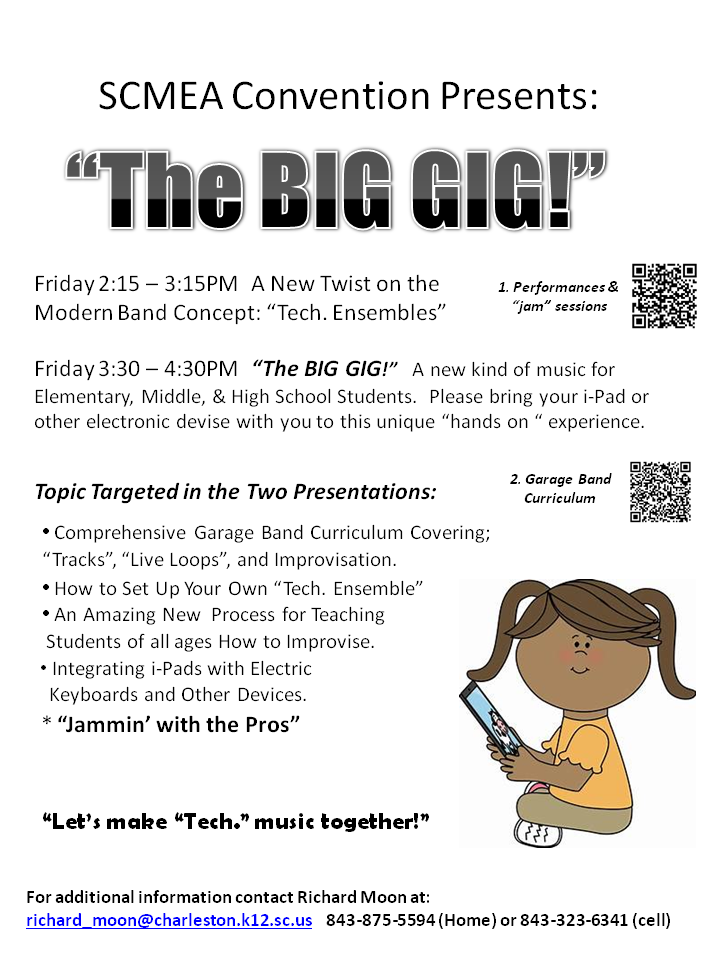
South Carolina Music Educators Association Presentation:
New Cell Phone number is 843-925-6302, I prefer using the other number though (land line).
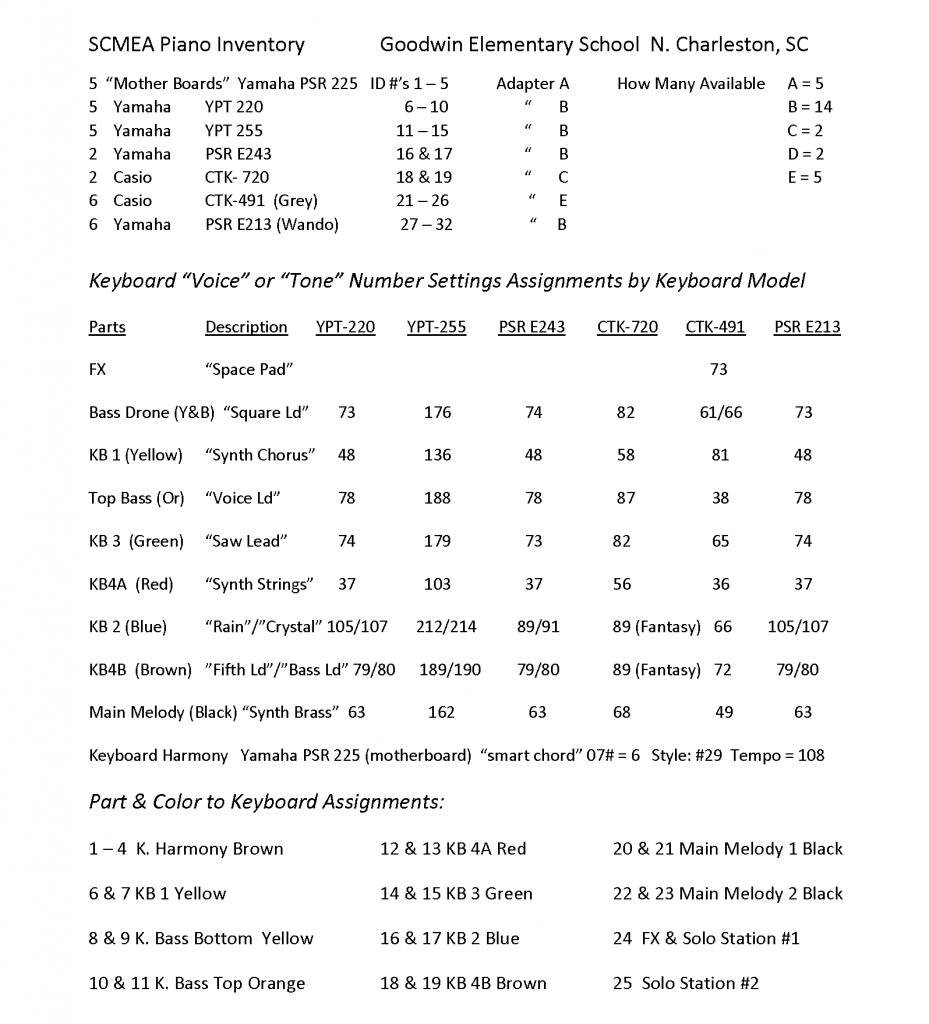
Inventory, Settings, Part and Color Code Assignments for Goodwin Keyboards:
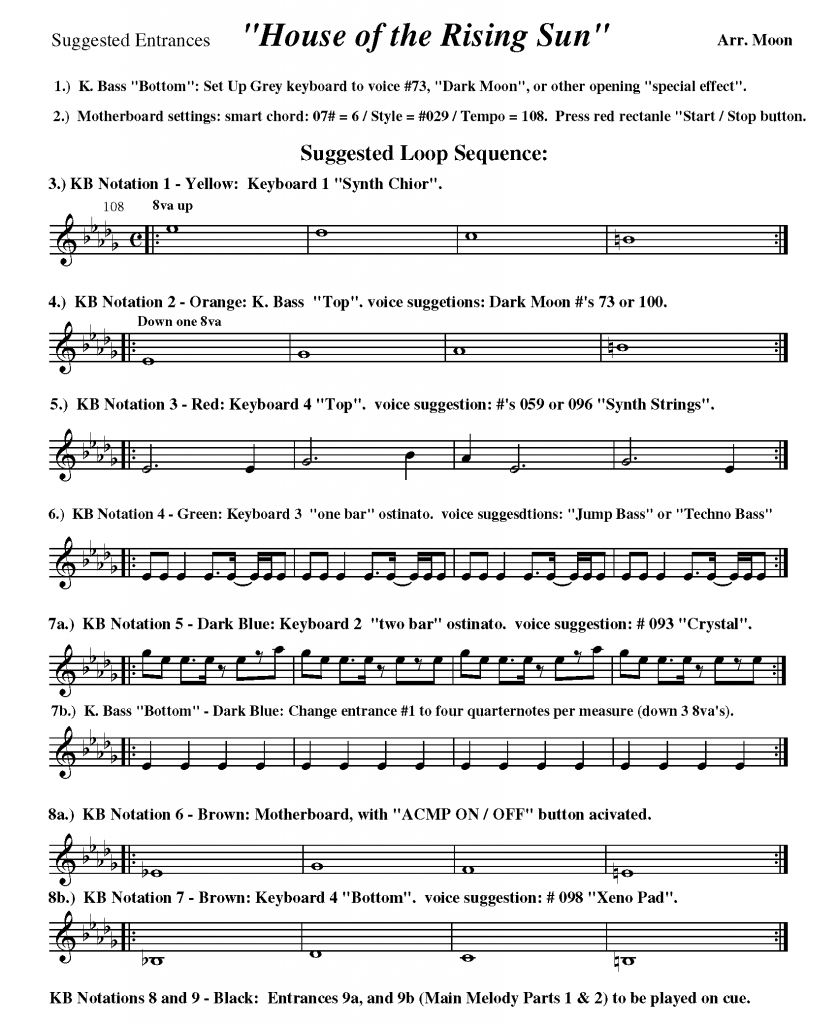
Keyboard "Script" with Entrance Sequence:
Cueing Entrances by Colors:
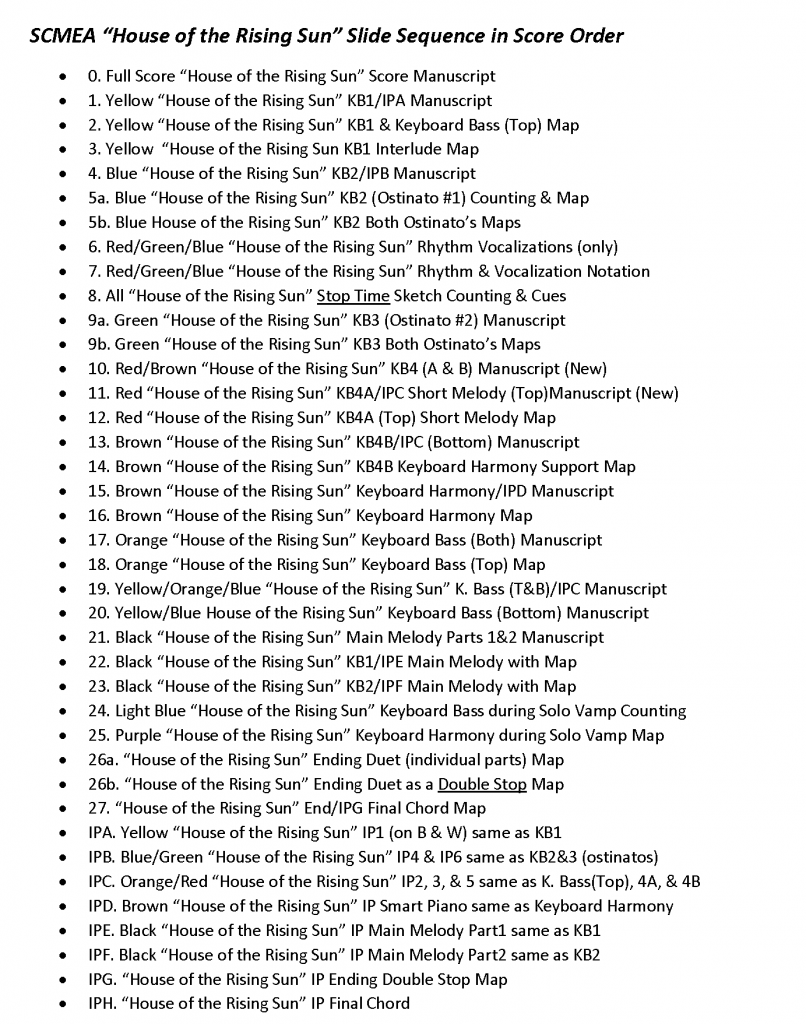
If an arrangement or sketch is rather involved, the use of colored construction paper can help clarify things for the younger musician. A good example is “House of the Rising Sun” when many entrances are staggered at different times. Assign a certain color to each part or entrance, and match its corresponding colored construction paper (as best you can) with a similar colored marker. Note: It is a good idea to laminate your construction paper making them easier to handle. Color the top right or left corner of each corresponding part with that same marker. Prior to each entrance hold up their color of construction paper and verbally or visually count them down (“5, 6, 7, 8”) at the time each section is to enter. This is also helpful in organizing and keeping track of songs that have an excessive number of parts.
Below is an example of how I broke down “House of the Rising Sun” for the “BIG GIG” in Columbia South Carolina on February 16. There are two ways I organized the data, “score order” and “entrance order”. The lists I used are uploaded below:
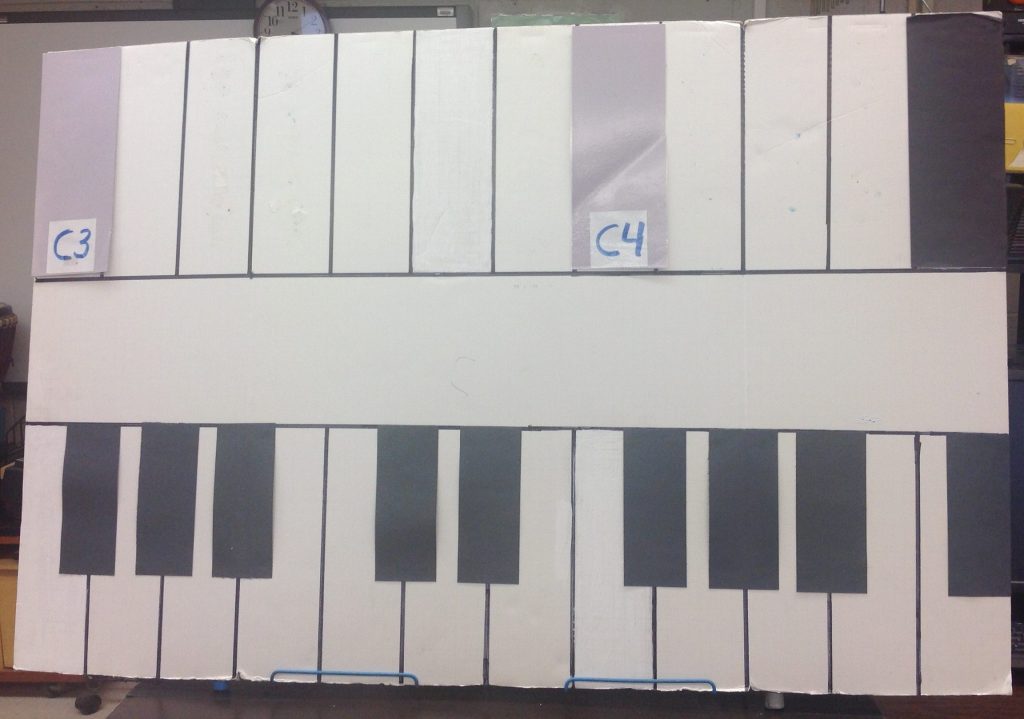
The "mini-Big Board:
Science board converted to model keyboards and i-Pads.
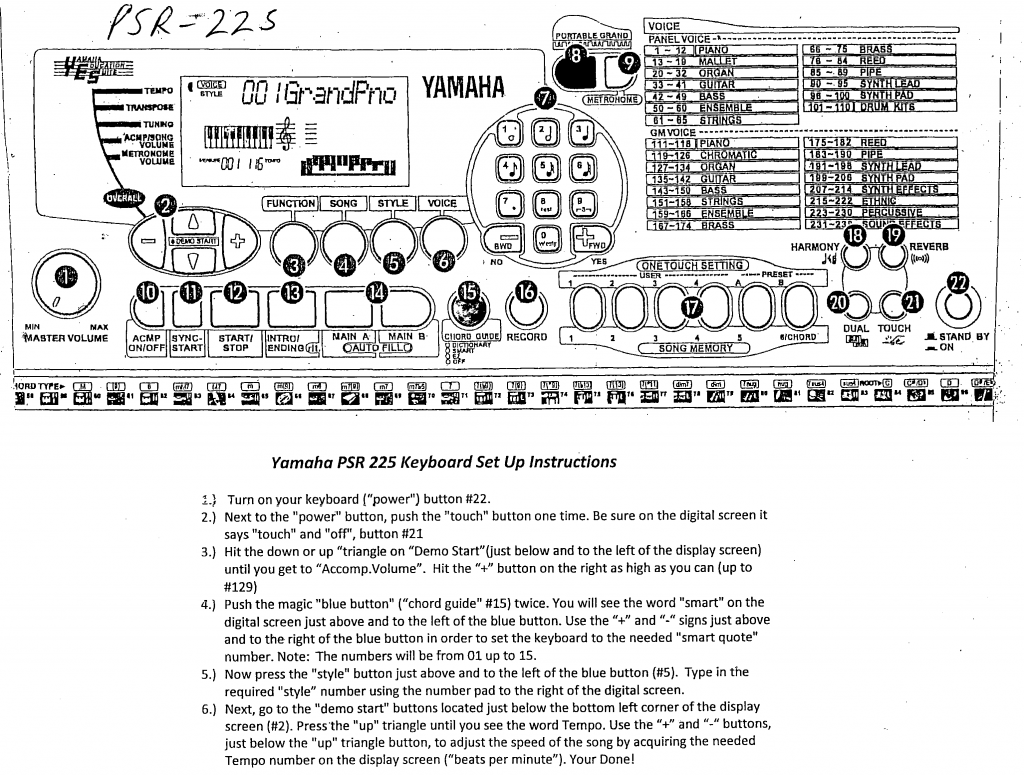
Yamaha PSR 225 Electric Keyboard:
The Yamaha PSR 225 is the only electric keyboard I know of, that has the “magic blue button” or “smart chord” settings. “Smart chord” assigns 15 possible chord combination settings to each note of any give scale. These 15 different chord combinations can cover a majority of major, minor, and modal keys that particular scale progression creates. The “motherboard” player plays the tonic note of each desired chord (with one finger) and the PSR 225 does the rest. The final background sound of harmonies, drum set, and accompanying “backup” instruments, will be determined by the combination of the “smart chord”, style, and tempo settings the player initially programs into the keyboard. In all keyboard arrangements and improvisation audio files, the necessary settings are already pre-determined and notated for the “mother board” performer.
Keyboard Master Key Name Reference Sheet:
Blank Keyboard Reference Map:
Keyboard Ensemble's CD Project for 2016 to 2017:
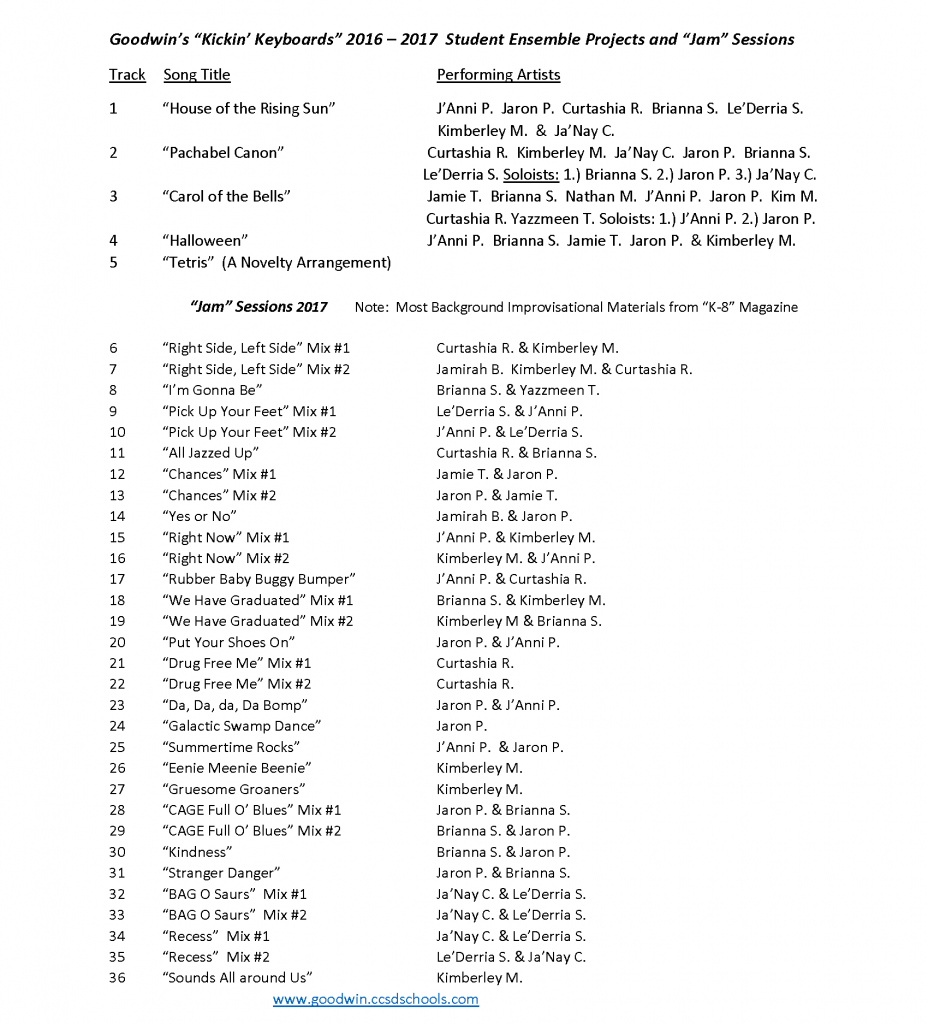
Latest Updated Keyboard & "Tech." Ensemble Repertoire List:


Teaching Improvisation To Young Children Using Technology and... fruit?
Dear Music Educator,
Introducing improvisation in a game format will motivate students to follow the “game rules” to guide them to consistently good sounding improvisational solos. Once the game rules have been established, the trial and error process of what sounds good and what does not can begin. In the game, if neither competitor is eliminated for “breaking the rules”, the competing solos must be compared, with the most interesting and creative solo designated as the “winner”. This is necessary to allow one of the teams to add one point to their score, thus continuing the competitive spirit of the game. The solos can be judged by the teacher, or the entire class, guided by a series of leading questions from the teacher. This will involve students in the decision process and will help them reflect on what constitutes a good solo. Another positive aspect of establishing a competitive atmosphere is the depth in which students compare and analyze their solos with their peers. Many times, when students improvise, they might be falling into a variety of “bad habits” and not be aware of it. However, they might notice these habits when performed in the improvisation solos played by their peers. This, in turn, will help students identify any negative aspects in their own soloing technique making them less likely to make similar mistakes.
Note: When playing along with the original artist, check for any transposition requirements. When playing along with the Finale “playback” files, no transpositions will be needed. Other great resources can be found at “Little Kids Rock” and K-8 Magazine, Plank Road Publishing Co.
Best of luck,
Rich Moon
Summerville, SC
843-875-5594
Introduction to Improvisation and the "Smack Down" Game:
Improvisation Basics, “the game”, and “Jammin’ With the Pros”
One of the key elements in this improvisation learning process is “Jammin’ with the Pros”. This is when the students have an opportunity to solo along with a recording of “top-flight” jazz musicians. The initial goal is to “not make the original recording sound bad”. This begins by following the basic “Rules of Improvisation”. Since all key and scale formats are determined ahead of time for each jam session resource, a student’s selection of notes becomes a “non-issue”. All the notes the soloist has access to will sound good most of the time and “chaos” is averted by strictly using diatonic motion. In other words, they soloing student is only allowed to play one pitch left, one pitch right, or remain on that same pitch each time that soloist plays a note. Other rules include: starting in the middle of the keyboard, avoid or limit the use of the lower register (left side of the keyboard), or play ONLY on the white or black keys as is designated (if using a traditional keyboard). The most important rule, however, is, NO SKIPPING! Most of the focus the first year I work with the children is on how to “sculpt” or “shape” a good improvisational melody.
“Smack Down”
I reinforce the “rules” by playing a music game the students really enjoy called “Smack Down”. “Smack Down” (or also referred to as “the game”) is basically an elimination tournament where students go “head to head” (in the “Arena of Doom) and the student that first breaks a rule is eliminated. As students master the rules, additional elements are gradually added to “the game” that will help students create more interesting melodies. Students study “syncopation” and begin to use then expand its use when playing their solos. “Tie Breakers” are added like; who utilizes the greatest range of notes on his or her instrument, or avoids repeated rhythm patterns and does not accidentally “re-use” the original melodic rhythm. As the students continue to advance, I end up being the final “tie-breaker”. If neither student breaks a rule after three “rotations”, I must decide which competitor played best-constructed solo, or who used syncopation the most creatively.
Eventually, I have the students that didn’t solo help me decide the winner. Terms or “enhancers” (such as Velocity, Variety, and Silence) are added to help students define and analyze their peer’s improvisation solos. I will not allow a student to offer any comments during a critique used to determine a winner unless he or she can “put into words” the positive and/or negative aspects heard by one or both of the competing soloists. When I feel the students are ready, I will find a really nice “blues” resource recording and introduce the class (or ensemble) to “blues” notes, how to use them, and why they must be used “sparingly”. The final element added to this “improvisation process” is our “secret weapon”. The secret weapon gives each performer the super power of “unlimited technique”, but I will save that topic for a later time.
“Jammin’ with the Pros”
My favorite resources I use for recording our “jam” sessions are with “Creative Commons” and the “instrument only” tracks from the choral music presented in K-8 Magazine. Paul and Theresa Jennings are well known as arrangers and composers and have successfully published in all aspects of band literature. The “Jennings” and their staff also write “killer” jazz charts to back up their chorus arrangements for their magazine. As far as I am concerned, one of the biggest reasons my kids have such success with improvisation is due to the great crew of Milwaukee based professional musicians they get to play along with. That is where the real teaching lies, hence, “Jammin’ with the Pros”.
I have set up my “jam sessions two different ways. I now use mostly “Pro-Tools”, recording two soloists (alternating turns) at a time through a midi-interface. Using the “recording studio” (as we call it) at our school I can record “jam” sessions using either i-Pads or electric keyboards. I also have used two i-Pads with their headphones connected by a “splitter”. After an introduction, I cue them when to switch back and forth. When the recording is done, the soloist (which was not playing the resource track during the recording) will “air drop” his or her unaccompanied solo track to me or the partner. Next, I will convert the unaccompanied track to an MP3 (by e-mailing it out) and then inserting the MP3 into his partners recorded project in Garage Band with the original resource track. When that is done, I go to the editing mode and line up the added track to reflect when they switched turns. Since I started doing “jam” sessions, I also ran into the “Jam Session” function in Garage Band that does the exact same thing using WiFi, with a lot fewer steps.
Recording “jam” sessions at Goodwin Elementary School
At Goodwin, we have an “activity” or “club” period the last 20 to 25 minutes of each day. I normally run about two students “jam” sessions per week and try to rotate turns and record each ensemble member once every two or three weeks. I post all “jam” sessions on our school’s website. This allows the students to listen to their work and critique themselves prior to his or her next recording session. I also have practice material they can access, but I NEVER let them hear the music they will be recording until the day of that recording session. It is rather due to the limited amount of time, so the students take it pretty seriously. Remember, our first goal is NOT to make the musicians we are recording with “sound bad”. When the students eventually begin to find themselves “hanging in there” with the “Pros”, they take more and more personal pride in their sessions. It is really fun to watch the children’s confidence grow and their behavior becomes more “professional” as the year progresses.
Outline of a Typical “Jammin’ with the Pros” Recording Session:
– The students come as I am playing the resource audio file for that session. If I am using “Pro-Tools” I will set it up to “loop”.
– Students set up their keyboards (or i-Pads) and look up the key, scale format, or other keyboard settings on the smart board or on the list they have in their ensemble folders. They will also grab a headphone set, plug it in and put it on, and then sit down and “solo” along that day’s song. Depending on where we are in the year, I may also let the kids select the keyboard “Voice” or “Tone” they wish to use for this recording session. Students love to pick out their own sounds, and it helps differentiate who is playing when as they listen to their recording later on.
– As the students are setting up and practicing for their improvisation session, I set up 4 to 6 blank recording tracks and run a “sound check” on both instruments.
– When the recording studio is finally set up, the headphones come off and we run through our target song one time.
– After we finish the “run through”, we briefly talk about the solos both just played. Each student will critique the other, making both positive comments and suggestions for improvement. If we are still in “the game” phase of the year, I also issue “Bach Bucks” for each rotation a soloist correctly follows our “rules for improvisation”.
– We record “Mix #1” with student “A” going first. The students know when I cue the next soloist in, the one presently playing stops immediately. I watch the sound wave progressions as we record, make adjustments as needed, and cue the last soloist when we are coming close to the end of the song.
– We normally don’t discuss the first recording unless something really bad happens. I will quickly re-name the recently recorded tracks with each student’s name and then move on to “Mix #2”.
– I then have to remember to “mute” tracks 1 & 2 and then “activate” 3 & 4. In “Mix #2” Student “B” goes first in the rotation. I normally do not even try switch solos at the same places when we record the second time. I just try to balance the soloing opportunities for each performer as best I can.
– I seldom have time for a third “Mix”, although it happens every once in a while. I will label the soloist’s names on tracks 3 & 4 and right about then, the after-school announcements begin. That is the student’s cue to put away their equipment as I transfer the “jam” sessions from my laptop onto a flash drive. We are then off for dismissal.
My Favorite Day of the Year
The reason “the rules” are initially so important, is that it helps your students “ear” get used to what scales sound like. No trial or error is needed to find which pitches work and which do not since the students “pre-set” their instruments prior to playing them. The “rules” are easy to understand, and the “winner” of each round is clearly identified, so everyone can be actively involved in “the game” the very first day. An “unintended” result is that several students get good at “hearing” when a competitor “skips over” one of the keys, without watching them play. After all, this is a “competition”.
Once they seem to have a good sense of what scales sound like, and it is getting harder and harder to determine who wins each round (relying on “tie breakers” more than eliminations). In this next phase (to your students) you will instantly become the most hated teacher at your school. They will argue with you, whine and complain, but your response is always to be the same. It is time, “D” Day has arrived.
“The Day”
As you are playing “the game” eventually a student will skip a key while playing his or her solo. You look like you plan on “buzzing” (the sign of elimination) the child, but you don’t. To your students, you should look confused, not sure what you are doing. Your other students are thinking, “For gosh sakes. ‘Buzz’ this kid already. He skipped. Let’s move on to the completion”. Again, you do not “buzz” that soloist, you let it “slide”. Why you ask because the “skip” sounded OK and maybe even good (or at least it didn’t hurt the solo). Alarms go off, sirens begin to ring, and your class is in an instant uproar. They will yell “Hey! That’s not fair” or “HE SKIPPED!” as your children protest in numerous different ways. Your response is, and should always be: “Well yeah, but it sounded good”.
The animosity continues as you hear how “unfair” you are. Stay strong and be brave my fellow music educator. Inevitably you will hear someone ask, “Well, does that mean I/we can skip too?”. Now you must sound and act really “sheepish and unconfident here. You say, “Well I guess so, if it sounds good”. The lid is now off “Pandora’s box” and it will take some time to put it back on. As you continue “the game” they will start “skipping” all over the place, it will become a “skipping” epidemic. You must now stand firm. If it sounds good to you, let it go, if it doesn’t, “BUZZZZZZZZZZZ”. It will now become to each student a “moral imperative” to “skip” when playing a solo and getting away with it.
Some of your students will figure it out, others will not. They will challenge your decisions and ask, “How come when Johnny “skips” he gets the “Bach Bucks” and when I “skip” I get “squat”? This is the next most important response in this process. You shrug your shoulders and say, “I don’t know, it just sounds better. You figure it out”. The seed has been planted, now let it grow. The paying attention and listening in class and when peers play a solo will now increase exponentially. By this time, I have already added the “enhancing elements” so I will let the class (or ensemble) help me decide if a competing soloist’s skip(s) sounded good or not. At this time students will also share their opinions on who had the most creative or entertaining solo in order to decide which student should win that round. Again, students cannot just say “I like Joey’s best”, they must give a reason and justify it in terms that we have learned and used in class.
Eventually, calm and order will revisit your classroom. Your children will develop their own clear opinions on what makes a solo sound good and what does not. They will apply this knowledge when it is their turn to play a solo, as well as, learn a lot from listening to their peers and from them what they think works and what does not. The competitive atmosphere you once purposely created eventually gives way to collaboration, sharing, and helping each other. All because you inspired, required, or forced your students to “figure it out” on their own. Enjoy your children’s journey and marvel at the progress each one makes throughout the school year. “May the ‘music’ force be with you”.
Sincerely,
Richard Moon
K-8 Magazine Keyboard and i-Pad Resource List (Alphabetized):
Possible "Apple" ResourceMP3's from the "Creative Commons":
Independent Curriculum Study for Jazz Band Keyboards (in five steps)
- Start with the iPad, and on “Smart Piano” teach the student how to set up chords off a piano music sheet or jazz band score onto the “Smart Piano” in “Garage Band”. Teach the student also how to move the columns around if a better, more efficient, chord sequence can be found. Focus on playing complimenting rhythms with the ensemble on the iPad. “Rule for Columns”: When changing columns you could move up one row, down one row, or stay on the same row. Explain to the student they are hearing chord “inversions” which are the different ways chords can “sound”.
- Play your iPad with your right hand (smart piano) and left hand the bass line (tonic note’s only) which are defined by that alphabet letter in each chords name. Play the bass line (left hand) first on Smart Piano (the last three rows of the bottom section), and when ready, transfer the bass line to a separate black and white key keyboard.
- With the right hand, continue playing the smart piano (one finger only) as the left-hand will play the bass note (in root position) adding the next note up of the designated chord. Allow students to write in their second notes in on their music (in pencil) when they start out.
- Flip now, and have the right hand play the chords (triads) on a different black and white key keyboard (not on the iPad), as the left hand plays the same chords on the smart piano. In other words, what they were playing with the right hand before, should now be played with the left. At this point the teacher may have to teach the student how to “spell out” triads (keep it simple), onto their music or separate sheet of manuscript paper. The student should practice by his or her self initially, to be sure the music the two hands are playing sound similar (no “clunking” notes). Worry about “inversions” at a later time.
- In the final step, the right hand plays the chord or “triad” on a black and white key acoustic or electric piano, as the left-hand plays the bass line on that same keyboard. Initially play both hands rhythmically in unison and later progress to “cross rhythms”. When you think the student is ready, they can go back to the iPad and practice the different chord “inversions” with the right hand on the full keyboard and (by listening), try to find that same inversion (which rectangle in each column) sounds the same with the left hand.
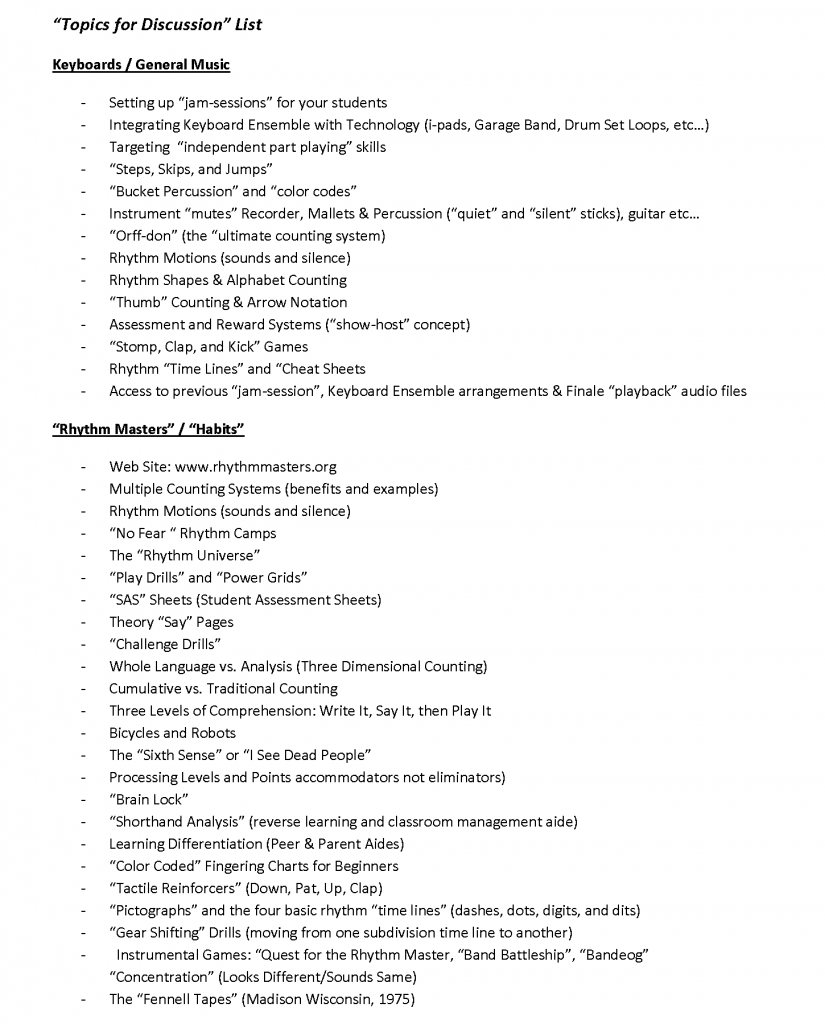
Optional Topics for Discussion at the SCMEA Conference Sessions:
Dear Educators,
Attached are two charts that basically outline the concept of what I call “Orff-don”.
I have also heard it referred to as a “modified French” version of Orff. It addresses the lack of different syllables at each location on “rhythm time line” if using both duple and triple meter. Another concern about using Orff with older musicians is the “weak anchor” (up-beat) having the same sound the down beat has when counting 8thnotes. This kills any possibility of reverse engineering applications which I used successfully with the “cumulative counting” approach I developed in the “Rhythm Masters” series. The Takadimi counting system addresses these issues but does not “flow off the tongue” as easy as it could and I also found “sequence recall” very difficult. I’m also a firm believer in what Gordon always talks about: “children learn best by teaching what is different, not what is similar or the same”. In this way, an Orff “duple” and Gordon “triple” combination would not only immediately delineate their differences “phonetically”, but give each “meter matrix” its own distinct feel or “groove”.
The key to fusing the two systems had to be in unifying their vowel usage. The “T” and “D” constants are very brief and non-committal. The ear will focus on the vowel, forgiving minor consonant indiscretions at common points on the combined rhythm time line. Basically, by taking the Orff “Ta”, and changing it to a “Tu” (Too), the alignment with the Gordon’s “triple” lead sound “Du” (Doo) is quite pleasing to the ear. Simultaneous performance of the duple and triple meter’s intersection is a better match. The “weak anchor” or up-beat in duple meter, “ti” (tee) now lines up perfectly with the triple “micro-syllable” “gi” (gee) at the very center of the time line. Here again, we have different soft consonants but the same vowel sound. I also like the idea of freely shifting in and out of “decoding phonetics” to a “performance” phonetics, allowing easy transitioning into faster tempos. Ironically enough, both phonetic versions end up being how we teach most wind players how to “triple” and “double” tongue. The modified system is simple, and yet still reversible, allowing for multi-direction instruction and rapid comprehension confirmation. The duple and triple meter’s first micro-beat is “ka” (kah) and “ga” (gah) and the last is “ko” (koh) and “go” (goh), so even the placement of the vowel sound is the same in each meter.
You now have a different vowel sound at every time line position. “Doublets” and “triplets” are easily configured by switching out the “T” and ”D” lead consonants. All vowel usage stays exactly the same. I have experimented with “multi meter rhythm warm ups” that layer duple over triple meters to really challenge young students to locate the pulse and focus on multi part rhythmic performance. The nice thing about the warm ups is (if done correctly) the similar vowel sounds always line up. What really makes the “French” version so much easier to learn than “Takadimi” is a little game I play with my elementary kids introducing duple in kindergarten and triple in first grade. It is kind of “hoaky” and hard to explain without the visual aids I use, but it works. If anyone is interested in how I introduce the system, or any of the advance materials I have created for Orff-don, feel free to give me a call on my phone at 843–875-5594. I do not answer my phone during school, but I’ll try to get back with you in the evenings.
"Tucan do the Tango" - ("Tu-ka-ti-ko" vocalization game)
""Do the Doggies They Go Here?" ("Du-ga-da-gi-de-go" vocalization game)