“Rhythm Shapes” – An Exploration Into Alternative Counting Systems:
Dear Music Teachers,
I have not forgotten about you “general music” teachers out there. For the last fifteen years of my teaching career, I taught general music “K -5.” During that time, I experimented with many different counting systems, which is where I really gained my teaching rhythms “chops.” I found that if I could break things down or relate music to one of the “four basic elements” of teaching, it would make the instructional process much more manageable. Those four elements (in order from simplest to more complex) are; “shapes” and “colors” (tied), then “numbers,” and finally the “alphabet.” One would hope students had a good start in these four areas before entering kindergarten. Using one of these as a reference (or as an actual “base language”) would instantly lower the “processing level” or “operational memory” needed, not having to learn a whole new language and set of representative symbols. This advantage would undoubtedly simplify the “decoding” of rhythms for the younger music student.
In the First sheet (00), I should have called an “overview” of “Rhythm Shapes” rather than an introduction. I will explain the “break-down” and get more specific in the course of this presentation. Sheet #01 is a “tactile” demonstration of our first three shapes for the quarter and 8th notes, along with 8th note “triplets.” Students perform “pulse” by patting on both laps and each shape’s “subdivision” by clapping one’s hands. As you pat both laps, you say the name of each shape as presented. To perform the shape’s “subdivision,” you clap on each syllable as you say it. Another dimension to the “tactile” experience is using “touch buttons” and “sliding finger” techniques, which we will expand upon later. Basically, as you say each shape, the student touches the “X” on their paper. If that shape has more than one syllable, you “slide your finger (on the paper) following the red arrow(s). Work with your students on arriving at each intermittent “X” exactly upon saying each syllable, without stopping or raising their finger off the page until the next shape is presented. Your finger then leaves the paper and touches the first “X” associated with the next shape, which occurs precisely on the next “down-beat.” Another option offered would be introducing students to traditional “meter signatures.” In doing so for “Rhythm Shapes,” I might use the terms “2-square,” 3-square,” and “4-square” instead of the number “4” at the bottom.
The follow-up to sheet #01 is the first exercise sheet #02a. Exercise numbers 1 – 3 focus on the pulse, and 4 – 6 target subdivision. An alternative version for numbers 4 – 6 is supplemental sheet #02b. Use this version if you prefer using “touch buttons”/”sliding finger” over clapping. Sheet #03 now adds 16th and 16th note “triplets” to our overall rhythm vocabulary. Instead of “cir-cle” for 8th notes, “dou-ble-cir-cle” stands in for 16th notes. Likewise, “dou-ble-the-tri-an-gle” (count them, that’s six syllables) will now fill in for a set of two 16th note triplets. We will probably never find a need for 16th note triplets in our classroom’s counting curriculum. Still, it does set up a “pulse” and “subdivision” game, focusing on and developing the same skills as with the “Time Line Dimensional Transfers” article written about in the August edition of the “Teach Music” magazine. The following exercise sheet is #04, which introduces the “full line” and “single measure” repeats for the first time. However, I elected NOT to do “Double-the-triangle” and, throughout the “Rhythm Shape” series, decided not to use “bar lines.” That is one less process that the students need to deal with and is not necessary for the goals I wish to accomplish with “Rhythm Shapes.”
Sheet #05 is the second exercise sheet for “duple meters,” but bump things up to another level. If you wish to go on and use this sheet, you will have to introduce your students to “whole,” “half,” and “quarter” rests independently. The “stop sign” will slowly transform (like in the “Transformer” movies) into the “double bar” symbol as the series progresses. Exercise numbers 5, 6, & 7 add another dimension if you feel your students are ready for it. The “parenthesis” used is a symbol for “TBA.” On full “8 1/2 by 11” sheets of paper, I have printed out all of the shapes used so far. I hold one of the shapes up a few shapes before the parenthesis appears for the class to see. It is an “eye scripting” exercise to get the students to first look at the exercise sheet, bring their eyes up to the teacher to see the card displayed, and then get their eyes back on their paper. It is also a way to begin working with students on the skill of “reading slightly ahead” of where you are counting or playing. This skill is challenging for the less experienced musician, but the kids think it is just a fun “teacher vs. student” game. Besides, you can’t tell me your kids are “excellent” at following their director now, can you? Although it is a bit more challenging, you could include the three new “rest” cards into the mix. Now we are talking about counting “multiple beats” and starting to teach students to count “silence,” or as many of them think of it, “counting nothing.” Good luck with that one!
All that we have covered so far might be a little rough for elementary school with the more advanced “stuff,” but I have gone pretty far into the curriculum with 4th and 5th- graders. It certainly would be doable (and actually kind of fun) with middle school general music classes. The first six PDFs cover the “Rhythm Shapes” curriculum for “Duple Meters.” In the following “installment,” we will only have to introduce one new shape, and then everything (note-wise) we have talked about up to this point ties right into “Triple Meter” counting as well. That being said, you will then have almost ALL rhythm counting possibilities covered for both the duple and triple meter “rhythm universes.” Until then, take care.
Sincerely,
Rich Moon
“Completing the Circle” – “Triple Meter” Our Second Rhythm Universe
As I mentioned in the first part of “Rhythm Shapes,” I created many different counting systems over my years as a general music teacher, mainly just for fun. However, this is also where I did a lot of work with student “processing levels” and simplifying counting concepts for young students studying music. Due to “skill levels” being so diverse at the elementary level, the goal was how to help the students that were surpassing their “operational memory limit” to avoid the “crash” that seems to follow inevitably. This reaction was even more evident and exaggerated at the elementary level.
One thing I noticed with my experimentation with teaching different counting systems was when learning a 2nd or 3rd system; students would use the first one learned as a “reference point.” Each new system used had its advantages and disadvantages compared to the previously learned ones. I found it interesting that students would use these earlier counting versions as a “fall-back” when the new system introduced started to give them trouble. They would revert (on their own) to an earlier version they found easier or more manageable. In a sense, students were always instinctively looking for ways to lessen their use of processing levels on their own. Another observation was that this tendency to mix in the “present” system with concepts from the past often resulted in the students creating their own “hybrid” counting system. I explain this “self-back and forth” experimentation: “Never underestimate the ‘laziness’ of the human brain in its quest always to seek out the easiest way to accomplish a specific task.” In this way, students themselves will accommodate for their own different and unique learning styles. All teachers have to do is be willing to provide them with that opportunity.
My daughter, Ryan, is presently an ESOL teacher in the Berkeley County School District and also a flute musician. She is aware of my research and explains its procedure in the following manner: “Dealing with students that have limited (if any) English, I am addressing similar situations. Learning any counting system is just like learning a different language. When you look at a piece of music and realize the ‘multi-tasking’ requirements added to it, your brain seeks the easiest path for decoding. That is called ‘code-switching.’ In the case of music, “code-switching” is the process of jumping from one counting system to another, whatever makes the most sense to our brain at that time. In this way, the brain constantly seeks the most straightforward path possible to find a solution.”
In “Rhythm Shapes,” we need only to add one new “shape” to complete our rhythm universe of “triple meter.” The “star” acts as the shape for a single 8th note in 3/8, 6/8, and 9/8… meters, which can be labeled as 3/”star,” 6/” star,” and 9/” star” (see sheet #08, attached). In “triple meter,” the circle is still the quarter note (two syllables), and the triangle is three syllables, which also takes on the role of “pulse.” In the case of triple meter, the triangle will not be subdivided into three “attached” triangles (as is written when using triplets in ‘duple” meter). Note that the red arrows in the circle and triangle examples in sheet #08 model the path if using the “slide finger” option. Sheet #09 is our first (and “basic”) exercise sheet. It starts with each shape separately, then mixes them up in different combinations. The full-line repeat can be optional but leaving it in acts as a nice “eye-scripting” exercise at this level. In the “duple meter” exercises, we did not write bar lines until we got to the last exercise. Similarly in sheet #09, we bring them back to review the use of “single-measure” repeats.
Exercise sheet #10 (the second for triple meter) is a bit more challenging, including more difficult shape combinations and the re-introduction of the “TBA” symbol, the “parenthesis.” The parenthesis is where the teacher has the different shape “pictographs” written or printed on 8 ½ X 11 pieces of paper. These pages are held up (one at a time) before each parenthesis in that exercise. You have to be quick, but the idea here is to train your student’s eyes to move quickly back and forth from their worksheet up to their teacher and back. “A,” “B,” & “C” are warm-ups that can or cannot be used, followed by exercises at three different difficulty levels. The number of parenthesis in each line determines that line’s difficulty level. Remember, when working in “triple meter,” you should usually set the metronome to the velocity of the eighth notes.
Sincerely,
Rich Moon
“Rhythm Shapes” / Drum Set Applications
Now that I have presented the “Rhythm Shapes” concept of counting, let me show you an example of how we might apply it. Believe it or not, I created a drum set curriculum for my elementary general music classes, up to twenty-four 4th or 5th graders at a time. I divided the class into three different “stations” “body drum sets,” mini-sets, and full drum sets. I was fortunate at my elementary to have two lovely Yamaha drum sets I sometimes used with our 4th and 5th grade “Keyboard Ensemble.” The mini-sets were simply a snare drum set up with a cymbal on a stand next to it (I used about four of them), and the rest were performing on their “body” drum set. After each completed exercise, we rotated positions. Everything in the curriculum was color-coded using pictographs that “morphed” eventually into music notation. I also used a FANTASTIC interactive drum set website at “Little Kids Rock” which I inter-wove my curriculum around. I even introduced the curriculum with a wild game of “Drum Set Twister.” Don’t hesitate to contact me if you are interested in more information about anything within this correspondence.
The “Two Hand’ Rhythm Shape’ Exercises” (exercise sheet #01) were created to teach a two-part “rock” style on the drum set. For the “body” drum set, the right-hand crosses over and plays on your left shoulder, and the left-hand crosses under the right, playing on the right lap. The “hands” are color coded with “R” for the color red and the right hand and “W” for white and the color black (as in black & white) representing the left. I would pass out “straws” (one of each color) for students to hold in the appropriate hand, eliminating the “process level” of having to remember which hand is which, and had students reference their straw colors instead. By this time, we had already covered the majority of the shapes used, but I did introduce the quarter rest (a “slashed” square) and eighth rests, the first circle of two being “slashed.” In the last exercise, I even introduced a basic “drum fill” using “double-circles” with “right (or red) hand lead” sticking. We played the first measure of each line three times, setting up a basic four-bar phrase. It is not only logical and more musical, but you can use any “rock” style MP3 to play along with the exercise.
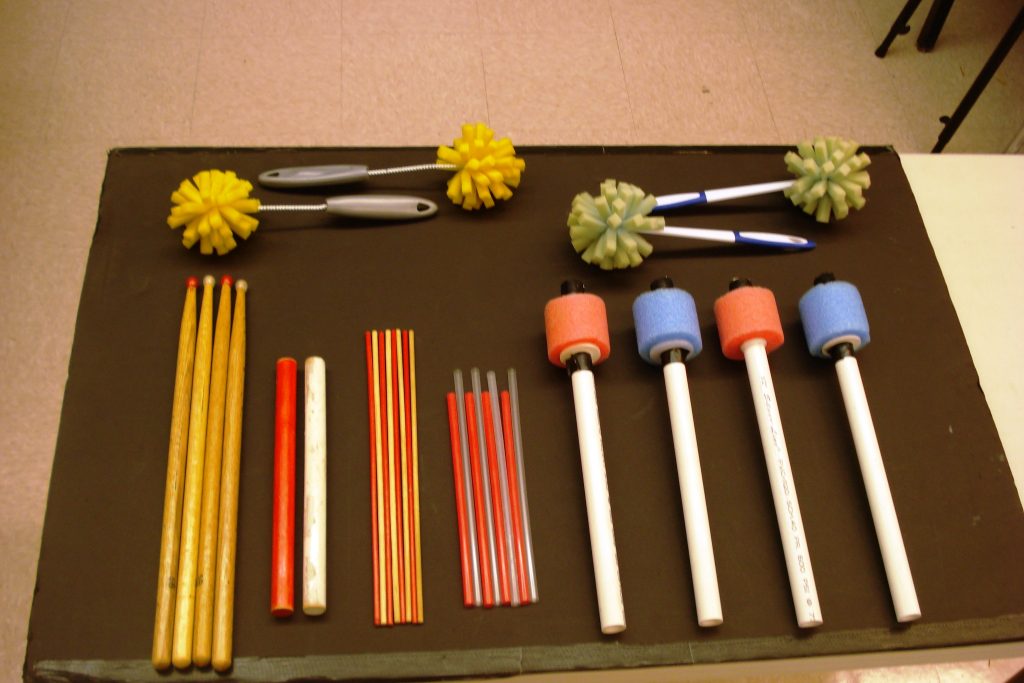
The image attached (#02) shows you the red and white straws I used for the body drum set, which I collected at local “fast food” restaurants. For the “mini” and drum sets, I preferred using the thin wood and red painted “dow” rods to help manage the sound volume in the classroom. If I wanted to use regular drumsticks, I would buy cheap ones with plastic tips and spray paint half of the tips red. In this way (even with regular drum sticks), students could still use the assistance of color coding. I began teaching rhythm shapes in kindergarten and used “Lumi sticks” with them and my first-grade students. I would buy the straight wood sticks and spray-paint them (half red and half white), so everything (even for the “beginners”) was color-coded, and they could perform specifically written “sticking” combinations. 2nd & 3rd grades followed up with “bucket drums,” and the 4th and 5th graders used different size buckets (creating a variety of pitches) for their “bucket ensemble” curriculum. That is what those “homemade” mallets you see were for (which only cost me $1.00 per mallet to make), which actually worked better than store-bought drum mallets.
Sheet #03 uses rhythm shapes to effectively introduce our drum set curriculum’s “swing” style. I wanted to eventually transition from the “shape” pictographs to some form of numeric counting, which I wrote below each line. By this time, I had already introduced “triple meter” counting to the students but had not taught (nor did I feel they were ready to learn) the “double-the-triangle” pictograph. I still wanted to work on a very basic drum fill, so I chose to use the phrase “Now-do-a-drum-fill-then” (six syllables), notating it using “stars” instead. A little later, I added “triplets” as an alternate way of writing out and saying “fills” when playing them on the drum set. I thought you might be interested in an example of “Rhythm Shapes” applying its notation for practical music performance. Using one of the “four basic elements” (which I discussed in an earlier correspondence), I believed I could achieve performance levels earlier than would normally be possible. It all comes back to controlling the “processing level” number and the “operational memory” needed to perform the music tasks we require of our music students.
Sincerely,
Rich Moon